Taswar Bhatti
The synonyms of software simplicity
LearningRustVSCode

I wanted to talk about basic types in Rust. Lets begin with Numerical Types in Rust, since Rust is a statically typed language, which means that it must know the types of all variables at compile time. I will talk about number types that are built into the language.

Numerical Types

Numerical values are divided into Integer Types and Floating-point type. A simple numerical type can be signed integer types or unsigned integer types.

Signed integer types start with i instead of u

Integer Data types are listed below:

  • i8 : The 8-bit signed integer type.
  • i16 : The 16-bit signed integer type.
  • i32 : The 32-bit signed integer type.
  • i64 : The 64-bit signed integer type.
  • u8 : The 8-bit unsigned integer type.
  • u16 : The 16-bit unsigned integer type.
  • u32 : The 32-bit unsigned integer type.
  • u64 : The 64-bit unsigned integer type.
  • isize : The pointer-sized signed integer type.
  • usize : The pointer-sized unsigned integer type.
Type MAX MIN
i8 127 -128
i16 32767 -32768
i32 2147483647 -2147483648
i64 9223372036854775807 -9223372036854775808
i128 170141183460469231731687303715884105727 -170141183460469231731687303715884105728
u8 0 255
u16 0 65535
u32 0 4294967295
u64 0 18446744073709551615
u128 0 340282366920938463463374607431768211455

Floating Point data types are simplier, there is only 2 types.

  • f32 : The 32-bit floating point type.
  • 64 : The 64-bit floating point type.

Summary

This was a short intro to the numerical values and the limits of each value in Rust.

LearningRustVSCode

Continuting on from where we left off, in this post I will refactor my code to use a function such that I can reuse my code later on. I will showcase how to write Functions in Rust with VSCode.

Intro

If we look at our previous post we have a very simple main function and it is just getting user input and then it outputs it with the println method. Its not one of the most elegant code but we we taking baby steps here. As a preview of our code code, it looks like below.

Now we would like to extract the read_line into its own function, the way we will do it is like below, I will explain in details after the code sample.

What I have done is create a function with the fn keyword and named it get_name, afterwards you see a -> character which tells the function that it will be returning a String.

You do not need a return statement in Rust the last value in the function acts as a return value

I have also called the trim function, the only issue is it returns a str rather than a String so I have to call to_string() in order to convert it back to String.

pub fn trim(&self) -> &str
Returns a string slice with leading and trailing whitespace removed.

If we run the program we will see this kind of output.

Now I dont know if you are like me, but I don’t like the output of this code, the input readline is right after the print statement. I would like to have the input right at the first line where it states “Pleaes enter your name:”. Let’s try to modify our code so that we can get the input in the same line.

What you see is I have first imported std::io::{self, Write};. So what this does is it imports std::io; and also use std::io::Write;. Therefore we can use the call for io::stdout().flush().unwrap();, since we imported std::io also.

Now if we run the program, we will get the code formatted in the way we want to.

Summary

So we have seen how to refactor our code into a function and in our next section lets build on this concept but change it to a game as simple as Rock, Paper, Scissors.

LearningRustVSCode

In this post we are going to take our baby steps in learning Rust and the simple example of a hello world would not just cut it. We will now introduce how to Capturing User Input in Rust.

Intro

To get started we will use our trusty cargo package manager again to create a new project for us. If you have not used cargo yet, please look back at my previous post on how to setup cargo.

This will create a file system looking like below.

We will open the main.rs file and modify it. We will add a variable to hold the value of the username. One thing to remember is Rust variables default to being immutable. Once an immutable variable is assigned, you cannot change the value stored in the variable. There is also a way to explicity to make a variable as mutable and you will need to use the mut keyword for that. So lets try to add a varible named “name” like the code below.

As you can see above we have defined a variable using the let keyword and we have also defined it as mut so that is is mutable i.e change its value after creation.

You may have also noticed something as in String::new, this is how you defined a String which is a growable, heap-allocated data structure. There is also a type in Rust called str which is an immutable fixed-length UTF-8 bytes of dynamic length string somewhere in memory. If you come from a C++ or C programming lang you can think of String like std::string and str as char*, if that helps.

Getting input from terminal

Now onto how to capture input, inorder to get input one has to use the stdin library of Rust. Rust provides terminal input functions in std::io::stdin. There is a read_line function in stdin, and we need to use the use keyword to import the functionality into our program. Below is how our Rust program will look like.

So what we have done here is we are using the stdin() whcih returns an object granting access to the Standard Input. Afterwards we have called the read_line method passing in a Borrow variable with the & sign which allows changes to be made to the variable by the function. In this case we have passed in name as a Borrow variable, which creates a reference to the variable. (I will cover Borrow in later topics).

Afterwards we also have an expect function which if the program crashes Rust returns a Result object, basically you are checking that the function worked by calling expect. Lastly we are using placeholders to print the value of name. Now lets try to run the program.

As you can see above I have enter my name “Taswar” and it outputs “Hello Taswar” with a newline aftewards. We can use the trim function in String to remove it but for that I will cover in the next section of how to write a function around the input.

Summary

In this post we learned how to read user input in a terminal in Rust, in the next section we will refactor and cover how to write functions in Rust.

LearningRustVSCode

In this post I will go over how to write Unit test for your Rust application. We will continue with where we left off with the hello world program and see what Rust has to offer us in unit testing. Note: I will be Writing and Running Intergration Tests with Rust in VSCode.

Creating Rust test directory

Our directory would look something like below.

In our hellow_tests.rs file we will add the code like below, if you are coming from a C# or Java background, Rust also uses Attribute for test so it will look quite familiar, using # tag followed by [test] brackets. We are using assert! just to pass this test.

To run the test we can run the cargo test command like below.

If you remember we had our program output a simple println statement with Hello, world!, so our test needs to check the output of our program. In order to do so we will introduce a new cargo package into your system.

Lets modify our project dependency and use crate assert_cmd to find the program in our crate directory.

Adding development dependency to Cargo.toml

Open the file Cargo.toml and add the dev dependency like below.

Now we will need to modify our hellow_tests.rs file we will add the usage of the assert_cmd package.

Above you will see that I am using assert_cmd and have changed some of the code to use the Command library. In the above code you will also see I am using a strange variable naming “let mut”. You may wonder what that is?

let mut what is that?

So variables in Rust are immutable by default, and require the mut keyword to be made mutable here. I am also using cargo_bin so that it can automatically find the output of the hello world program.

Unwrap what is that?

You also see I am calling a function called unwrap, so unwrap() is used here to handle the errors quickly in our test. It can be used on any function that returns Result or Option (Option is also an enum). If the function returns an Ok(value), you will get the value. If the function returns an Err(error), the program/test will panic. In our case if it does not find the hello program it will be in panic mode.

Next I have used assert with success to find out the command was successful and trying to match the Hello, world! output. If we run this test we will see that it will fail.

One may wonder what is wrong with it, so basically what we are missing is the newline character in our test \n in our stdout, so lets modify our test code and add the newline character.

Now the output of our test should be passing.

Summary

I understand the fact that this is a very brittle test checking the output of our program to match a certain string. The idea of this is for you to learn how to write simple unit test in Rust and how the ecosystem works. I hope this helps in your journey, we will continue on our learning Rust journey to write simple unix/linux command line tools and built upon that.

LearningRustVSCode

I recently started to look into Rust and found it quite interesting and fun to work with, reminded me of working a bit like go and C lang. Thus I though it would be good to go through a blog series on of learning Rust with VSCode.

I will be using WSL Ubuntu 20.04.3 LTS for my development. If you are not using WSL yet, it allows you to have a linux terminal right inside of your windows desktop. Windows Subsystem for Linux 2) allows users to run a Linux VM inside windows and gives a near native Linux experience.

Installing Rust

Lets install Rust in your Ubuntu environment.

The output of the command would look like below.

To verify your install try this command

Before we jump into VSCode, lets just try to create a simple hello world first in the most basic way without cargo (rust build manager, like npm).

Simple Hello World

Open a file and call it hello.rs and paste the code into it. You can use nano or vi or vim.

We can then compile with rustc and it will create an executable that your computer can execute/

Creating and Running a Project with Cargo

Lets create a new project with cargo. You may wonder what is cargo. Cargo is the Rust package manager. Cargo downloads your Rust package’s dependencies, compiles your packages, makes distributable packages, and uploads them to crates.io, the Rust community’s package registry. We will execute on your shell prompt like below and look inside the directory.

What is this Cargo.toml

Cargo.toml is a configuration file for the project. The extension .toml stands for Tom’s Obvious, Minimal Language. Lets take a look at the file

We also have the main.rs file, let’s take a look inside that file also, we will see that it looks similar to our hello world from before. Cargo has created a hello world sample for us.

This time rather than using rustc to compile the program, we will use cargo run to compile the source code and run it in one command:

The first three lines are information about what Cargo is doing. We can also use cargo run -q to make the output to be quiet.

What about VSCode?

So we can just type code . in your terminal it will launch vscode for us and we can then go into the extension section and install rust and rust-analyzer.

Install Rust Extension

rust-extension-vscode

rust-extension-vscode

Run Rust in VSCode

If you install rust analyzer then you will see the Run and Debug command ontop of your code where you can click on the run command to run Rust like below.

Run_Rust_In_VSCode

Run_Rust_In_VSCode

Here is the output that will show on your terminal.

Output_Rust_Terminal

Output_Rust_Terminal

Summary

So here is a quick summary of how to get Rust to run with vscode, in the next sections I will go through more learning of Rust and how to have fun with it.

aws-cdk-csharp

In this section we will talk about Identity and Access Management – IAM in short. I will show you an example of using AWS CDK to create IAM roles with C# and extending our current solution so that an IAM Role is ready with the correct permission to use. We will mainly focus on IAM Role and Policy. But first….

What is IAM?

AWS Identity and Access Management (IAM) enables you to manage access to AWS services and resources securely. Using IAM, you can create and manage AWS users and groups, and use permissions to allow and deny their access to AWS resources. IAM can help securely control individual and group access to your AWS resources. You can create and manage user identities, or IAM users, roles, policies and grant permissions for them to access the resources you wish to give permission to.

Additional things IAM Allows

  • Manage IAM users and their access – You can create users in IAM, assign them individual security credentials (in other words, access keys, passwords, and multi-factor authentication devices), or request temporary security credentials to provide users access to AWS services and resources. You can manage permissions in order to control which operations a user can perform.
  • Manage IAM roles and their permissions – You can create roles in IAM and manage permissions to control which operations can be performed by the entity, or AWS service, that assumes the role. You can also define which entity is allowed to assume the role. In addition, you can use service-linked roles to delegate permissions to AWS services that create and manage AWS resources on your behalf.
  • Manage federated users and their permissions – You can enable identity federation to allow existing identities (users, groups, and roles) in your enterprise to access the AWS Management Console, call AWS APIs, and access resources, without the need to create an IAM user for each identity. Use any identity management solution that supports SAML 2.0, or use one of our federation samples (AWS Console SSO or API federation).
(Additional information at: https://aws.amazon.com/iam/)

IAM Roles

In our case we wish to grant our applications that will run on an Amazon EC2 instances access to AWS resources. This is where IAM roles comes into play and allow you to delegate access to users or services, IAM Roles are intended to be assumable by anyone who needs it including IAM users, AWS services including machines and applications in our case. One can assume a role to obtain temporary security credentials that can be used to make AWS API calls. Note that IAM roles are not associated with a specific user or group, instead a trusted entities assume the roles, such as IAM users, applications, or AWS services. The best part of IAM Role is that you don’t have to share long-term credentials or define permissions for each entity that requires access to a resource. Isn’t that cool?

IAM Policy

Now that we understand an IAM Role, but how do we write rules etc for that role? This is where IAM Policy comes in, a policy is an object with identity or resource, defining their permissions one can also associate with 1-N Roles of a policy. Best practices is to use multiple policy since they are free. AWS IAM evaluates the policies when an IAM principal (a user, role, or group) makes a request. Permissions in the policies attached to the entity determine whether the request is allowed or denied. Policies are writting in json format, and one tip is when you are reading a policy always use the EPRAC format to evaluate it.

  • E is for Effect of the policy
  • P is for Principle of the policy (a user, role, or group)
  • R is for Resources of the policy (a service etc)
  • A is for Action of the policy (Allow or deny)
  • C is for Conditions of the policy, matching some condition ip address or require MFA etc
(For more info read: https://docs.aws.amazon.com/IAM/latest/UserGuide/access_policies.html)

Two types of policies

There are two types of policies one is managed policy and also an inline policy.

  • Managed Policy – has a name and can be attach to multiple users, group or roles. Think shareable policy, AWS has predefined policy in the system already that one can use.
  • Inline Policy – a policy that is embedded in an IAM identity (a user, role, or group) only, you cannot share it.

Show me some code now please

Sorry to bore you with all the details but those roles and policy are important and when things don’t work they could be culprits of them. But in any case we will be adding IAM to our solution now, check out the diagram below. You will notice that IAM is outside our VPC, since IAM is a global service it will be out side and we will attach the role inside to the EC2 machine in our later post.

AWSCDKIAMRole

AWS CDK IAM Role

Now our stack we will look like this now

Build and Deploy

We will again use our good old trusty cdk to deploy the solution.

If we check our console we can go to IAM and look at Roles and search for Instance in the search box. You will see something like this depending on your stack name etc.

CdkInstanceRole

Cdk Instance Role Generated

If we go into the role you look at the permission we will see an inline policy also attached to the role.

CdkInstanceRolePolicy

Cdk Instance Role Policy Genearted

Challenges

  • How do we add/create a managed policy using the CDK?
  • How do we add a principle to our policy using the CDK?
  • How do we add a condition to our policy using the CDK?

Summary

I know its a bit boring and dry for IAM but trust me its an important building block of AWS, we went through knowing more about Roles and Policy and how to use AWS CDK to create IAM roles with C#. In our next section I will cover how to create auto scaling groups for our EC2 machines.

Source code: https://github.com/taswar/AWSCDKSamples/tree/main/CdkIAMSample

aws-cdk-csharp

In this section we will talk about Parameter Store what it is and why we would want to use it? I will show you an example of using AWS CDK Parameter Store with C# and extending our current solution.

What is Parameter Store

AWS Parameter Store is actually a capability of AWS Systems Manager. The AWS Parameter store provides secure, hierarchical storage for configuration data management and secrets management. One can store data such as database connection strings, passwords, Amazon Machine Image (AMI) IDs, or even license codes as parameter values. There is also one additional advantage in parameter store where you can store values as plain text or encrypted data since it is also integrated with Secret Manager.
For more info on Parameter Store you can view the AWS Documentation (https://docs.aws.amazon.com/systems-manager/latest/userguide/systems-manager-parameter-store.html)

Why would I want to use it?

From our previous deployment using CDK we saw that the db secret was stored in secret manager but it was a random string that was created something along the line of DBSecretB45K907. When we have multiple environment let’s say staging, testing and prod it will be hard to tell which one is which, since the dbsecrets will all have some random characters in their name, this is where Parameter comes and help. We can store the values in a path like format. e.g /myvpcsampledev/dbsecretsname. Now whenever we need to get the value of the dbsecret in our dev environment we can just refer to parameter store which will in turn use the Secret Manager. Make sense?

There are also additional advantages of Parameter Store

  • Store configuration data and encrypted strings in hierarchies and track versions.
  • Use a secure, scalable, hosted secrets management service with no servers to manage.
  • Improve your security posture by separating your data from your code.
  • Control and audit access at granular levels.
  • Store parameters reliably because Parameter Store is hosted in multiple Availability Zones in an AWS Region.

Now I hope you are sold on the idea 🙂 Let’s see how we use it in our CDK code to use Parameter store, later on we will use the same store to get the values.

Side note

Tier: Parameter Store provides two parameter tiers – standard and advanced. While standard tier lets you store up to 10,000 parameters and 4 KB per parameter in value size, advanced tier lets you store up to 100,000 parameters, 8 KB per parameter in value size and allows you to add policies to parameters.

Show me the code

Before showing the nitty gritty details of the code. Let’s see a diagram of what we are building and what we have added.

CDK ParameterStore

CDK ParameterStore

As you may wonder the parameter store and secret manager are not in your VPC. The reason is Parameter Store and Secret Manager are global services where they are hosted in multiple regions so think of it as a service you are consuming just like S3 etc rather than having everything inside your VPC. Now let’s look at the code and see what we will add to our Stack.

Note: ParameterName always starts with a / in front of it.

As you can see above we have just added a string parameter and we have used the db.Secret.SecretName as a StringValue inside of Parameter Store. What is left is for us to build and deploy the solution just like our previous solution with dotnet and cdk.

Once deployed lets look at the console to see how it would look like. Navigate to your CloudFormation screen on AWS Console, click on resources tab and from there find the Parameter store created link. Click on the link and you should be redirected to parameter store and you should see something like below.

ParameterStoreDbSecret

ParameterStoreDbSecret

Challenges

  • What happens when you change the parameter type to an encrypted (secure) string. Can you use SecretString?
  • What about SimpleValue, what are the differences?
  • What about StringListValue, what are the differences?
  • Can we use pattern matching for the ParameterName? (Hint: look at AllowedPattern)
  • What other attributes can we store in the parameter store for our db object we created

Summary

In the above example we saw how to use Parameter store with our CDK code, in the next section we will cover IAM roles and how we will use them to attach roles to our EC2 machine and database, think of it as a glue to allow security and access permission.

Source code (https://github.com/taswar/AWSCDKSamples/tree/main/CdkRDSParameterSample)

aws-cdk-csharp

Now that we have learned how to create a VPC with C# using AWS CDK, let’s talk about how do we create RDS Database Instance with C# using AWS CDK.

What is Amazon RDS?

Amazon Relational Database Service (Amazon RDS) in simple terms is easy to set up, operate, and scale relational database. It provides cost-efficient and resizable capacity while automating time-consuming administration tasks such as hardware provisioning, database setup, patching and backups. When we use Amazon RDS, we can set up, operate, and scale a relational database in the cloud. Amazon RDS also supports several different database engines, including PostgreSQL, MySQL, Oracle, and Microsoft SQL Server.

What do we plan to build?

We will be using Microsoft SQL Server instance in the example below, you can use any other RDS instance of your choice also, but I thought SQL Server would be ideal for .NET developer. Supported Databases include MariaDB, Microsoft SQLServer, Postgres, MySQL and Oracle. For more information refer to (https://docs.aws.amazon.com/AmazonRDS/latest/UserGuide/Concepts.DBInstanceClass.html#Concepts.DBInstanceClass.Support)

The architectural diagram below shows that we will place our primary database instance in Availability Zone A inside the private subnet. Amazon RDS requires at least two Availability Zones for fault tolerance, but since we are using Microsoft SQL Server Express engine it doesn’t create a secondary instance.

VPC-subnet-RDS

VPC-subnet-RDS

Tip: When deploying an application in production environment always create a secondary Amazon RDS DB instance in another Availability Zone.

Where is the code

We will first need to use Nuget to install Amazon.CDK.AWS.RDS package. We can either use Visual Studio or the command line to install it into our project. Make sure to have the latest version of it.

Once installed you can add this code into your Stack class file. In our code based it will be CdkRDSSampleStack.cs.

In order for us to deploy this code we will again use the command line with cdk to deploy it. You may wonder where will the login and password be for the database, we will talk about that shortly. Remember to have your aws login pre-configured or else cdk deploy will fail, refer to the previous Creating VPC for additional information.

Viewing your information in the AWS Console

Once the cdk process is finished we can login to our AWS console to see what has been deployed so far. Go into the cloudformation section and we should see that our stack should have a CREATE_COMPLETE status like below.

RDS-stack-created

RDS-stack-created

We can then go into the Resource section of the stack and see that our DBSecret for the database has been created and it is actually using AWS SecretManager that contains the details of the login and password. We can also go to our database section in RDS and see our instance is up and running. We will not be able to connect to it from our desktop since it is in a private network and public connection accessibility is set to No.

RDS-SQLServer-MyInstance

RDS-SQLServer-MyInstance

Challenges

  • What if you try to use a different database engine, e.g MariaDB or Postgres what would you change in your code?
  • What happens when you change the current SQLServer to another version?
  • The current machine is not powerful for sqlserver. what other instance type are supported to run this?

Summary

This shows how we can easily use AWS CDK to create RDS Database Instance with C#, in the next part we will go over System Manager Parameter Store that one can use to store configurations.

Source code: (https://github.com/taswar/AWSCDKSamples/tree/main/CdkRDSSample)

aws-cdk-csharp

I wanted to start a series of how to use AWS Cloud Development Kit (CDK) to create infrastructure on Amazon. In our first example we will tackle the fundamental of a Virtual Private Cloud (VPC). We will be using AWS CDK to create a VPC in C#. You may wonder what about CloudFormation json or yaml files that Amazon allows one to create infrastructure that you maybe very comfortable in doing it, is CDK replacing that?

What about CloudFormation?

AWS CloudFormation enables you to do many things, below are some of the things that the CDK allows us to do. (https://docs.aws.amazon.com/cdk/latest/guide/home.html)

  • Create and provision AWS infrastructure deployments predictably and repeatedly.
  • Leverage AWS products such as Amazon EC2, Amazon Elastic Block Store, Amazon SNS, Elastic Load Balancing, and Auto Scaling.
  • Build highly reliable, highly scalable, cost-effective applications in the cloud without worrying about creating and configuring the underlying AWS infrastructure.
  • Use a template file to create and delete a collection of resources together as a single unit (a stack).

Rest assure that Cloudformation is here to stay and CDK is not a way to replace it, but think of it in terms of a SDK for you to create infrastructure in the language of your choice.

Ok tell me more about CDK?

The advantage of AWS CDK is that you can define your cloud resources in a familiar programming language. As it stands the AWS CDK supports TypeScript, JavaScript, Python, Java, C#/.Net, and (in developer preview) Go lang. As a developers you can use one of the supported programming languages to define reusable cloud components known as Constructs. You compose these together into Stacks and Apps. The other advantages of the AWS CDK include listed below:

  • Use logic (if statements, for-loops, etc) when defining your infrastructure
  • Use object-oriented techniques to create a model of your system
  • Define high level abstractions, share them, and publish them to your team, company, or community
  • Organize your project into logical modules
  • Share and reuse your infrastructure as a library
  • Testing your infrastructure code using industry-standard protocols
  • Use your existing code review workflow
  • Code completion within your IDE
More information at (https://docs.aws.amazon.com/cdk/latest/guide/home.html)

What is an Amazon Virtual Private Cloud (VPC)?

Before we get started I wanted to provide some information on VPC. With Amazon Virtual Private Cloud (Amazon VPC), you can launch AWS resources in a logically isolated virtual network that you define. You have complete control over your virtual networking environment. This includes selecting your own IP address range, creating subnets, and configuring route tables and network gateways. And the reason to use a VPC is that your applications and database will be accessible over the network, but you may not want them to be accessible to everyone over the internet. Using an Amazon VPC, you can control who accesses which resources over the network.

Show me what we are building

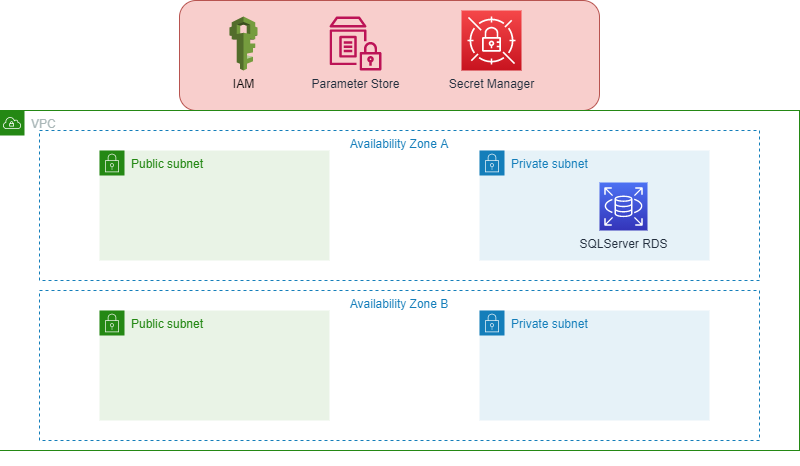
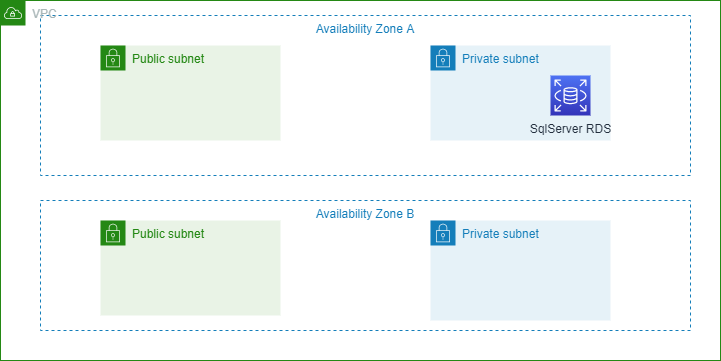
The diagram below shows us the VPC that contains two Availability Zones, and in each one you will see there are 2 subnets a public and a private subnet. The public subnet will allow internet traffic while the private will not.

Usually you want to put your infra in private and only allow certain traffic to go through and reach them through the public
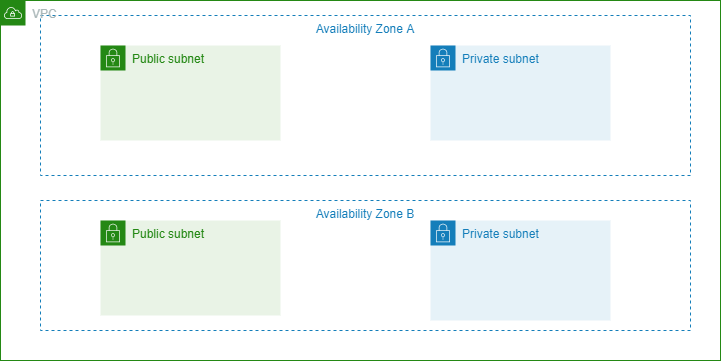
VPC-subnet

VPC-subnet

Requirements for CDK

In order to work with the cdk we will need 2 things, nodejs and the other is of course .NET 5 or 6. If you have nodejs and .net 5 or 6 ready then all you have to do is open your command line terminal and execute the following command to install cdk.

Now that the cdk is ready lets create a directory and intiliaze our application creation.

Lets take a look at what was created.

Below we have a list of generated application has created.

  • A cdk.json file, with AWS CDK configuration
  • A README.md file with some documentation that you may add for your project
  • A src folder with the C# application
    • A CdkVpcSample folder with the generated C# code
    • Program.cs contains the main file., where we define how we will connect to our cloud env.
    • CdkVpcSampleStack.cs contains the code for one CloudFormation stack (a stack is a collection of AWS resources that you can manage as a single unit), we use this to create the stack that we want.
    • CdkVpcSample.csproj is the project file.
    • GlobalSuppressions.cs deactivates one compiler warning.
  • Last but not least the solution file, CdkVpcSample.sln

We can now open the sln file in our visual studio and lets modify the Program.cs file. We will modify the code to use the Account Id that you have for AWS and also the Region you plan to use. If you wish to use Env variables you can use the first block also. For simplicity sake I am using the second block to target only the region I plan to use.

Now we can jump into CdkVpcSampleStack.cs file and add the code we wish to create the vpc. We will also use nuget to install the Amazon.CDK.AWS.EC2 package.
You can also just use Visual Studio and add the package through the UI, just search Amazon.CDK.AWS.EC2 and click on install.

Below is the vpc code that we will add to our CdkVpcSampleStack.cs file. Below we are creating a VPC with a CIDR 10.0.0.0/16 and 2 subnet one is public subnet with CIDR Mask of 24 and a private with a CIDR Mask of 24.

Let’s now try to build the project going to the root directory where src directory is and type in command line

Remember to target to .NET 5 or 6, you can change that in Visual Studio by right click and properties section.

How do deploy

In order to deploy first you will need a user who has programmatic access to your aws account. Reach into the IAM service on AWS console and create a user. You can read my other IAM post on how to create a user.

Once created you can use aws cli to configure the user you will use like below I have used an access key id and secret access for it.

Now you can finally deploy with cdk using the cdk deploy command.

Warning: This may incur AWS charges

If you now login to the AWS console you will see in Cloudformation section that your Stack was created, and also in your VPC section the VPC was create with public and private subnet.

Challenges

  • How to destroy the stack can you use cdk?
  • What happens when you do cdk deploy again
  • Change the Subnet CIDR to a different range
  • Play around with the MaxAzs option

Summary

I hope this helps in teaching and learning how to deploy a VPC using AWS CDK to create a VPC in C#, we will continue on with explorer more on CDK with .NET in the following with AWS RDS Database.

Source code located at https://github.com/taswar/AWSCDKSamples/tree/main/CdkVpcSample

BrotherPrinterRaspberryPi

I had this printer which is not a wifi built-in printer but nevertheless its a laser printer and I wanted to use it to print from any machine on my local network. I thought to myself why not use a raspberry pi and use cups. Thus my post on how to Setup Brother 1110 Printer on Raspberry Pi, I actually reuse the pi I had that is running pihole to block all the ads coming into my home network. Long story short I thought CUPS would be easy to setup and hoped everything will work, well of course things don’t just work without me tinkering on it, so here are the steps I used to finally to get it to work and hopefully it may help you also in your journey 🙂

First things first what is CUPS?

CUPS is a modular printing system for Unix-like computer operating systems which allows a computer to act as a print server. To install CUPS on a PI you can use the commands below.

Install cups and drivers from the Brother website
Login to your pi

Brother only provides i386 driver but as you may know Pi is a Arm processor so we need to somehow get them to work but first lets download the deb packages.

We will also add the architecture

We will also need to use Kali linux libc6 in order for this to work.

We will then extract the libc into a directory so that we dont need to mess with apt and then copy them over.

As you can see above we have 3 directories etc, lib and usr extracted into data directory. Now we will copy them over.

We will also add this to our env variable to build and then we can install our packages. You can ignore the warning, also you will get this error in cups also when you print so you can ignore that also.

Now lets install the cups wrapper.

Finally we need to restart our cups server

If you wish to manage cups with pi user use the commands below and then you can access cups with the web user interface on http://localhost:631

If you are using windows 10 you dont really need to install Samba you will be able to see your pi printer by just opening printer and add it will auto scan your network for it. Hopefully this will help you out and enjoyed reading How to setup Brother 1110 Printer on Raspberry Pi 🙂

UA-4524639-2