
As mentioned earlier I wanted to move my blog from WordPress to Gatsby. Let’s get started and get our feet wet with Gatsby using VSCode and see how it all comes together. I will be using VSCode for all my development for this migration.
Install Gatsby
In order to get started we need to satisfy gatsby requirement, that is to instal nodejs and npm. For mac you can use brew to install nodejs/npm and chocolatey for windows.
|
1 2 3 4 5 |
#Mac $brew install node #Windows PS>choco install nodejs |
Once you have installed npm you can execute the command below to install gatsby cli, I am installing it globally using the -g command.
|
1 |
$npm install -g gatsby-cli |
You can also install GatsbyHub vscode extension, I will use mostly the command line since I am comfortable with the command line. GatsbyHub does make it easy for people who like to just be in the IDE, it is optional.
Getting started with Gatsby
We will use the gatsby cli command line to create a new site, let’s create a new site called test-site with the cli. What the command line below will do is use the gatsby starter default template to create the site for us. You can provide other templates of your choice when creating the site. I will cover template later on.
|
1 2 3 4 5 6 7 8 9 10 11 12 13 14 15 16 17 18 |
$gatsby new test-site info Creating new site from git: https://github.com/gatsbyjs/gatsby-starter-default.git Cloning into 'test-site'... remote: Enumerating objects: 29, done. remote: Counting objects: 100% (29/29), done. remote: Compressing objects: 100% (27/27), done. remote: Total 29 (delta 2), reused 13 (delta 0), pack-reused 0 Receiving objects: 100% (29/29), 617.62 KiB | 1.21 MiB/s, done. Resolving deltas: 100% (2/2), done. success Created starter directory layout info Initialising git in test-site Initialized empty Git repository in /Users/taswarb/Documents/GatsbyProjects/test-site/.git/ info Create initial git commit in test-site info Your new Gatsby site has been successfully bootstrapped. Start developing it by running: cd test-site gatsby develop |
Let’s view the code in vscode and see what has been generated. Change directory into the test-site and execute $code . (this will open vscode to the current directory).

Gatsby VSCode default folder structure
In Vscode use the terminal and change to the current directory test-site if not in that directory and execute the gatsby develop to run the gatsby web server. This will allows you to use your local traffic to view the generated site, by default gatsby will use port 8000 and you will be able to view your site. In addition to your web site there is also another url for graphql that is being used by Gatsby. I will cover graphql later on.
|
1 2 3 4 5 6 7 |
You can now view gatsby-starter-default in the browser. ⠀ http://localhost:8000/ ⠀ View GraphiQL, an in-browser IDE, to explore your site's data and schema ⠀ http://localhost:8000/___graphql |
When we open our browser to http://localhost:8000/ we will see the starter page like below.

Gatsby default starter
We can also view the graphql UI on the http://localhost:8000/___graphql it would look something like the image below.
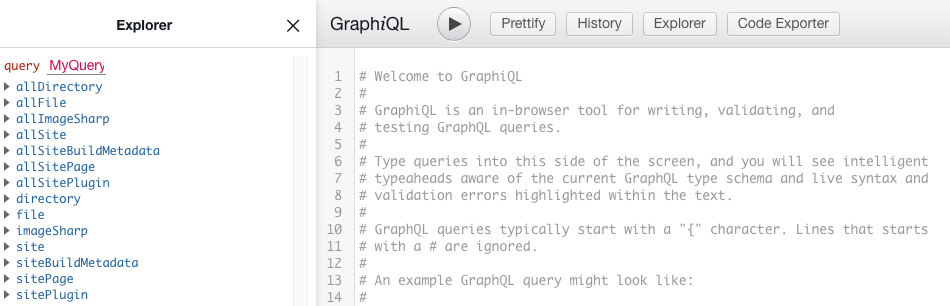
gatsby-graphql
You can use graphql to query for information about your site, just like the site that we have just created e.g we can query for the site title of our site using graphql. You can click on Site->SiteMetadata->title for it. It will then generate a query like below in graphql.
|
1 2 3 4 5 6 7 8 9 10 11 12 13 14 15 16 17 18 19 |
query MyQuery { site { siteMetadata { title } } } #It will output our site title. { "data": { "site": { "siteMetadata": { "title": "Gatsby Default Starter" } } }, "extensions": {} } |
Editing Pages
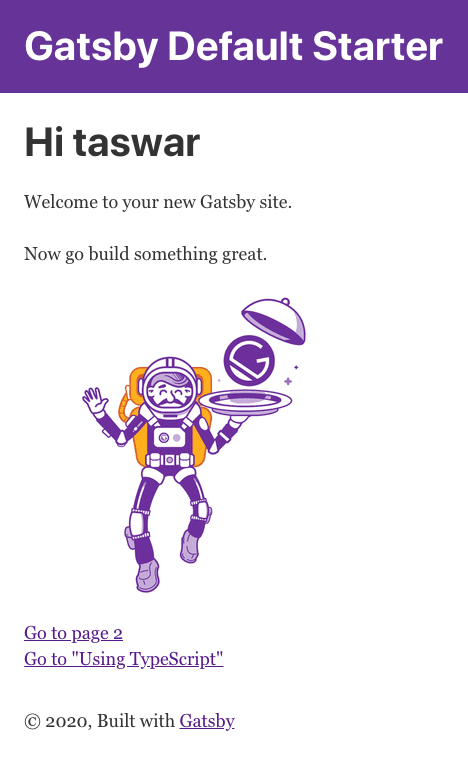
Let’s switch back to VSCode and open the src folder and drill down to pages folder. You will find src/pages/index.js file in there. We will try to modify it and say Hi “yourname” in there. E.g I will say Hi taswar and save it. Once saved you don’t even need to reload your page, gatsby will see the change and auto reload it for you.
|
1 2 3 4 5 6 7 8 9 10 11 12 13 14 15 16 17 18 19 20 21 22 |
import React from "react" import { Link } from "gatsby" import Layout from "../components/layout" import Image from "../components/image" import SEO from "../components/seo" const IndexPage = () => ( <Layout> <SEO title="Home" /> <h1>Hi taswar</h1> <p>Welcome to your new Gatsby site.</p> <p>Now go build something great.</p> <div style={{ maxWidth: `300px`, marginBottom: `1.45rem` }}> <Image /> </div> <Link to="/page-2/">Go to page 2</Link> <br /> <Link to="/using-typescript/">Go to "Using TypeScript"</Link> </Layout> ) export default IndexPage |
gatsby-changename
Adding new file
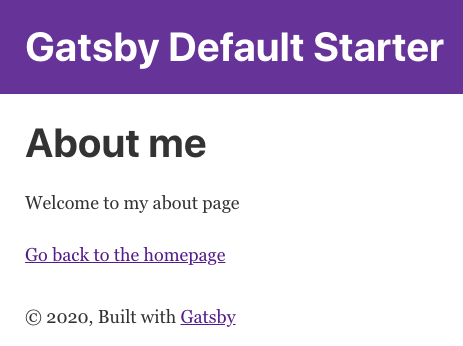
Now we will add another file to the pages folder, we will call it src/pages/about.js, place it into the same pages folder and add the code below to it.
|
1 2 3 4 5 6 7 8 9 10 11 12 13 14 15 16 |
import React from "react" import { Link } from "gatsby" import Layout from "../components/layout" import SEO from "../components/seo" const AboutPage = () => ( <Layout> <SEO title="About page" /> <h1>About me</h1> <p>Welcome to my about page</p> <Link to="/">Go back to the homepage</Link> </Layout> ) export default AboutPage |
Go back to your browser and try to visit http://localhost:8000/about. You will notice that all pages inside with js extension will automatically have the url based on the filename. E.g the 404.js file or page-2.js has the url as http://localhost:8000/page-2/. That’s pretty sweet right?
gatsby-about-page
Looking at the code you may also have notice some special tag called Link, that is a way for gatsby to link to internal pages. For external pages you will continue to use the a href links. The advantage of the Link tag is it allows preloading of data, again built into Gatsby.
Summary
We went through a simple case of Gatsby where we installed it, created a site using default template and using the develop server that comes with gatsby. We also tried out some of the graphql that gatsby provides. I will cover more in details of Gatsby in the next blog post so stay tuned.


Leave A Comment