Taswar Bhatti
The synonyms of software simplicity
Javascript

Here is another quick tip on creating modular JavaScript, namely function wrappers, or more technically called Immediately-Invoked Function Expression (IIFE). A self-invoking anonymous function runs automatically/immediately when you are create it, but don’t confuse it with document.ready or window.onload.

The basic of IIFE is to use a wrapper so that it does not pollute the global namespace, all variables used inside the function will not be visible to the outside scope. You may have seen this kind of code, something along the line of:

For example the variable defined below bar will not be able to access it outside the scope.
IIFE provides a protection/encapsulation to your code.

If you wish to pass in data to your anonymous function, for example in our code below we are passing in the global window object to our function.

The last benefit of using the IIFE, is that it provides a way to create more modular Javascript.

The code below shows a module called counterModule and how we use it.

And if you have written any JQuery plugin you may have already seen the module pattern used for plugins. In the code below we are injection Jquery into our anonymous function.

This is the very basic of a module pattern, and if you wish to read more about the module pattern I suggest you Addy Osmani book on Javascript Design Patterns

Javascript

Here is a quick tip for JavaScript falsy conditions for programmers or for people who come from Java or C#.

In Java and C# when we thinks of using a compare conditions in a if statements, we tend to use something along the line of:

We tend to bring this baggage of knowledge to JavaScript also, but it is not necessary. In JavaScript one can simply use the conditionals as below.

Here is a table that will show you what could be the values of val that would translate to false.

Type Result
Undefined false
Null False
String if length == 0, false
Object true
Number if NAN or 0, false

Here is some sample code if you wish to test out falsy in JavaScript.

Learning these fundamental idioms in JavaScript allows one to write cleaner Javascript code.

Jade

Jade Node.js Template Engine, Include & Template Inheritance Part 6

In this post, I will write about using includes and template inheritance in Jade template engine.
You can also check out my previous 5 post on Jade.

  • Jade Node.js Template Engine Part 1
  • Jade Node.js Template Engine Basics Syntax Part 2
  • Jade Node.js Template Engine DataBinding Part 3
  • Jade Node.js Template Engine, Conditional Logic Statements Part 4
  • Jade Node.js Template Engine, Filters & Mixins Part 5
  • Includes (aka partial views for .net developers)

    To include css, javascript, html file, one can use the include directive in Jade. Lets say, you have a css that you wish to include in your jade file, you can then use the include like below, include can also import any html file that you may, or even markup text.

    One thing to note is the scope in the parent file and the include file is shared, so it allows one to use variables inside the include that are defined outside. Also one has to use the right extension for the file with the correct path. The example above shows the data/copyright.html is an html file located in the data folder.

    There are also some other ways to include, css and javascript code blocks in Jade.

    Template Inheritance

    Most sites have a generic look and feel, and if you are using includes (partials) it could soon become very ugly and hard to maintain all the includes. This is where Jade provides us with template inheritance, using the Block keyword as placeholders to inject other templates into the view.

    We may have already seen this if we have used express web engine the layout.jade file as show below

    In order to use this layout file, Jade provides us with the keyword extends, for example in our index.jade file we can extend the layout like.

    From the above example, we see that we are replacing content, but Jade also provides us with prepend and append to the blocks. For example, if we wish to add zepto.js to our layout we can use the append keyword.

    Or if we want to prepend a css file to the link tag, so that style2.css loads before style.css we can use the prepend keyword.

    Note: Conditional statements like if else do not work with blocks since they are evaluated during compile time. The code below does not work.

    Summary

    This marks the end of the Jade, node.js template engine series, if you have any questions feel free to contact me, in the upcoming post I will write more about node and grunt/gulp (the Javascript task runner/ stream building system).

    Sign up and follow my mail list if you wish to be posted on upcoming blog post.

Jade

Jade Node.js Template Engine, Filters & Mixins

In my previous post I have talked about conditional statements inside of jade. In this post I will write about filters and mixins in jade template engine.

Filters

Filters in jade means something different from what you may know as filters like the ones in Angular.js. In Jade filters allow you to use different languages (text formatters) with jade template. (e.g CSS, CoffeeScript, markdown, etc), and all filters are compile time, thus they does not support dynamic content.

For example to use markdown we would first install markdown

Now if we wish to use markdown in our jade template, we can simply use the :markdown syntax, Note: all filters use the colon “:” syntax, eg. (:sass, :less, :coffee, etc)

Mixins

Mixins allow one to use reusable code blocks in jade. The way to declare mixins is by the keyword mixins following the tags that you wish to display, example

In order to use the mixin we just need to append it with the “+” sign

Mixin can also take arguments like function

One can also use conditional statement and blocks of jade inside of mixins, the indent statement below the calling of the mixin is taken as the blocl

In my next and probably last blog post on jade, I will talk about includes in jade and template inheritance.

Jade

Jade Node.js Template Engine, Conditional Logic Statements

In my previous post I have talked about databinding with jade, i.e. feeding data to your template. In this post I will write about how one can use conditional and logical statements (for, if, while statements) in jade template engine.

Ternary Operation

The conditional ternary operator can be applied in Jade as follow ( ? : )

Conditional Statements

Jade has built in (if, else statements, and also provides the unless statement)

Case statements

The case statement is more of a shorthand for the switch statement in Jade.

Iterators

Jade provides (for, each, while as loops)

In my next post I will write about mixins and filters for Jade.

Jade

In my previous post I showed the basic syntax of jade when using express application in node.js, in this post I will go over the DataBinding aspects of jade template engine.

Jade Node.js Template Engine DataBinding through Interpolation

Jade provides interpolation of variables using the #{} syntax, Hash, Curly Brackets.
For example if we have a variable called name with a value of John, to display from our controller in Express Web Application in Node through jade, we will code it like

We can also declare a variable inside the jade file, using the dash and var (although the var is optional), as the example shows below one can also access an array or hashtable like syntax.

Shortcuts

jade also provides a shortcut rather than using the interpolation syntax, by using just the “=” sign or by directly accessing the declared variables.

How to escape HTML

Sometimes we have to escape html in a string, even though jade prevents us from XSS, we may come across a situation we a using a wysiwyg editor, that requires non encoded text.
Jade allows us to escape html by using the “!” syntax, for both shortcut and non shortcut curly brackets syntax.


Hope you enjoy the series I will continue with our next blog with how to use filters and logic in Jade.

Jade

In my previous blog post I showed how one would install jade template engine for node.js and the terse markup that it provides. In this post I will continue on the jade and show the basic syntax of using jade template engine.

Basic syntax of Jade Template Engine for Node.js

As mentioned in earlier post, Jade is indentation-based, each level of indentation creates its own block. Thus the spaces are important/significant to it, also jade does not use end tags like html nor angle brackets. As we saw earlier in the p tag in our example.

Here is a simple example of h4 wrapped in span


In the next example if we removed the indentation we will not get h4 as the child of a span.


The using of the | character can also signal for a textblock of text.


Jade also provides a shorthand for textblock rather than using all the pipe “|” character one can just add a period to the tag, and add additional html elements.


Attributes

Attributes like class and id can be added by using the bracket sytanx to a tag, and multiple styles can be added with an array like syntax.


One can also pass in data as JSON for data-* attributes

Shortcuts

Here are some shortcuts of attributes for class and id when using jade, one can use the “#” for id and the period “.” of class right after the tag, and there is also automatic divs that jade provides


Block expansion

Sometimes the indentation could becoming annoying when you are creating ordered or unordered list.

Jade has a solution to this since being terse is what jade is all about, it provides a “:” shortcut to simplify this for us.

Comments and Block Comments

Jade also provides a way to comment out your template like the Javascript syntax it uses // and if you use // – it will not show the comment in the rendered html. It also provides a block syntax where if you indent the line after the comment it will comment out the following tags also.


Summary

I have covered most of the basic syntax of Jade here in this blog post, in my next post I will write about how to bind data into the template.

Jade

Jade Node.js Template Engine is a templating language for node.js, it provides an alternative syntax to write your HTML, some may say more pythonic or haml style. Jade by default comes with express web application framework for node.js, it is designed primarily for server side templating in node.js, and last but not least it is a high performance template engine.

Lets take a look at a simple jade file compare it to your html file.
HTMLvs Jade

As one can see the jade syntax is more terse and concise, but one has to remember those spaces/indentation are quite important for jade.

Installing Jade

Jade by default comes with express web application for node.js, but one can also install it by npm.

One can also compile and use jade with command line

To generate the html file we can run the jade command

As we can see above it automatically create the angle tags for us for the paragraph tag.

In my next blog post I will be covering the basic syntax of jade

bower

Continuing on our previous blog post on bower, in this blog post, I will talk about how to create your own front-end packages in bower. One thing I forgot to mention in the previous post is git is required when using bower. If you are using windows you can install git for windows or Mac/Unix/Linux.

The very first thing one needs to do is create a bower.json file in your project root folder. By using the command below

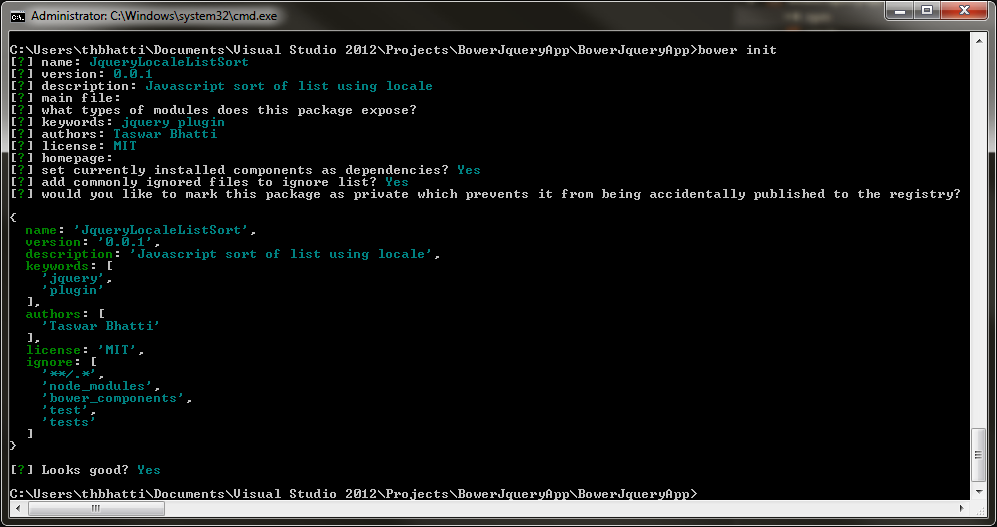
The above command will prompt you to fill in the form and afterwards it will generate us a bower.json file.
bower init

Lets take a look at our bower.json file


Adding Jquery

For our package, we will require jquery and in order to add our dependency to the bower.json file we can use the install command line. Note: the –save which will update our bower.json file, if we did not use the –save option it will not update out bower.json file.

Our bower.json file will now look like
I will now use my previous jquery plugin that I created for sorting a list and add it to my project. The code is not really the focus here, it could be anything that you wish to publish, even a simple function of hello world.
Next we will add a gitignore file so that we don’t push up the bower_components folder if we have any, also I will create a repo on github. Note: bower requires a version number by using the git tag in order for it to register your package.
If you wish to modify your bower package, remember to update your tag version and bower.json file version or else it will not be published
bower

My last blog post was about using bower in node.js express application Visual Studio, and I believe I did not do justice to it. In this blog post I will talk more about how to use bower for your front-end and all the command line associate with bower.

Again to install bower globally one can use the npm command line

To start using bower and to find packages e.g jquery, it will list out all the github repository that has jquery involved.

bowersearch

Installing Packages

To install latest jquery or by a version number we can append it with a “#” symbol like below, or by a git repo

In order to use jquery with bower on your site you can reference it in your html like

Uninstall or Update a package

To uninstall or to upgrade a package e.g jquery

To upgrade all installed packages one just needs to use

List installed packages

If one wants to find out what packages are installed in the solution one can use the command ls or list

bower ls

Information on a package

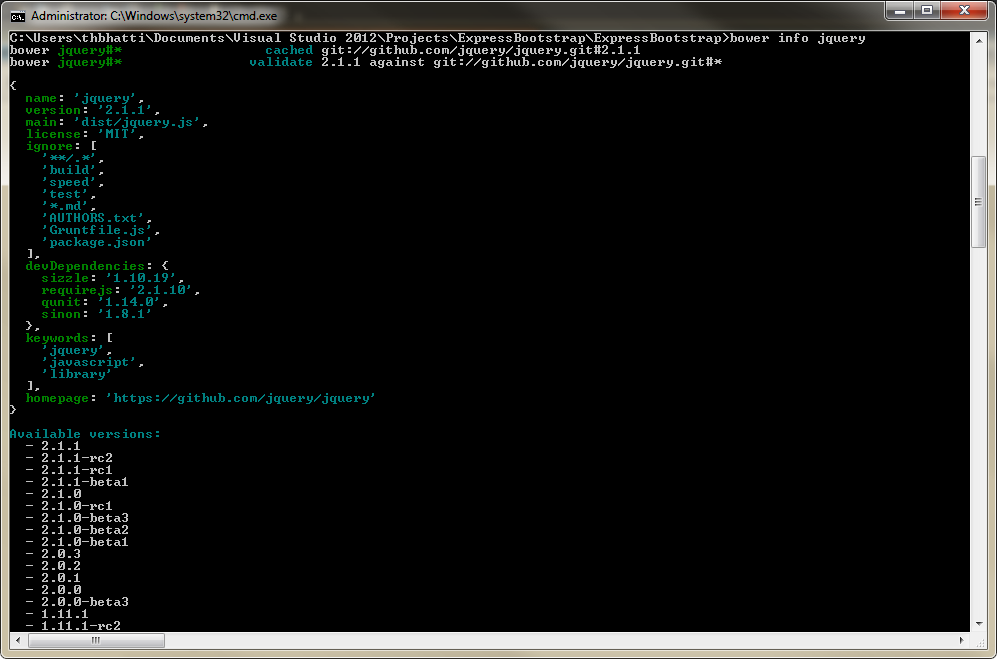
To find out information and version of a package that bower provides one can use the info command

bower info

One can also find out which repository bower is using for a package using the lookup command

There is also the home command which takes you the homepage of the repository, the below command will take you the github repository of jquery

Caching

Bower has a caching where when you run the install it will automatically download the package to your ~/.bower/cache so that when you run install again it will just use the cache version for a quicker install, on windows you will find bower cache to be located at C:\Users\YourUsername\AppData\Roaming\bower\cache and on unix/linux systems in your home directory ~/.bower/cache

One can also clear the cache by using the command cache-clear.

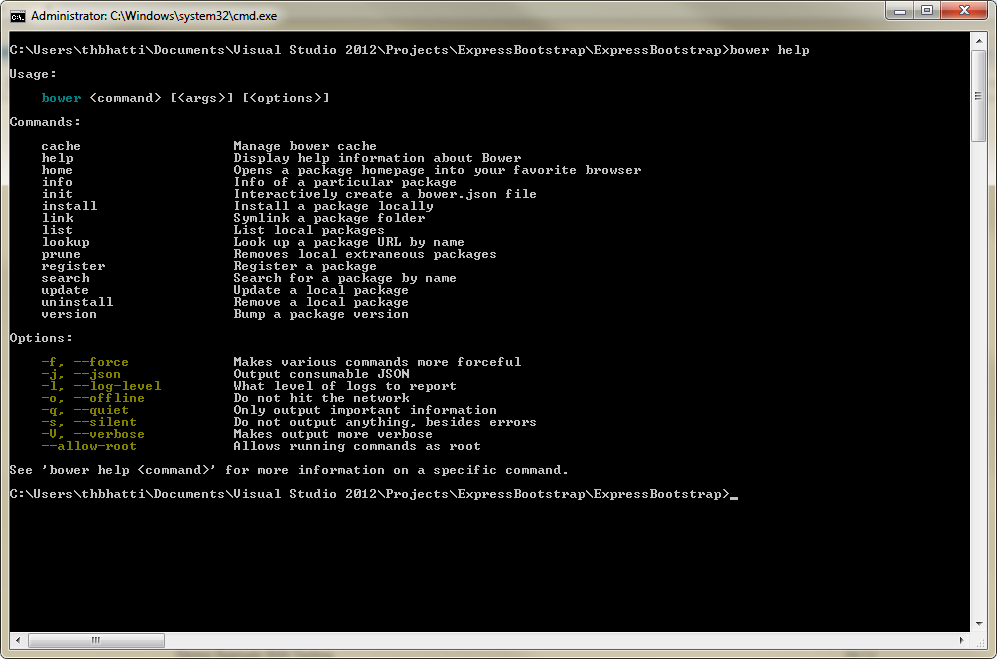
And last but not least there is also help command

bower help

In my next blog I will write about how to create your own bower packages and all about bower.json file.

UA-4524639-2