In this blog post I wanted to show how one can use C# or Python to view the serial numbers of a X509 certificate. The serial number can be used to identify the certificate that one plans to use in their C# application, lets say for mutual authentication to another service.
Why use X509 Certificates
- Client X.509 certificate identity adds an additional level of asymmetrical cryptography to the standard SSL/TLS channel.
- Long security keys (2046 bits)
- One can revoke certificates by using Certificate Revocation List (CRL).
- Easy to use in application to application
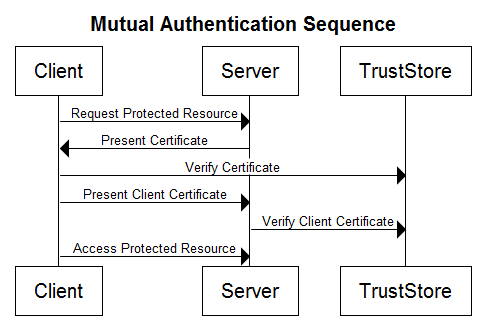
Mutual Authentication
View X509 Certificate Serial Number using C#
If you are using dotnetcore first create a console app using the command below
|
|
>mkdir certsharp >cd certsharp >dotnet new console |
The command above will create a console app called certsharp and then you can use vscode to load the application.
Below is the sample code that allows one to see the serial number in C#, dotnetcore.
1 2 3 4 5 6 7 8 9 10 11 12 13 14 15 16 17 18 19 20 21 22 23 24 25 |
using System; using System.IO; using System.Security.Cryptography; using System.Security.Cryptography.X509Certificates; namespace certsharp { class Program { static void Main (string[] args) { //filename of the cert could be pfx or p12 string filename = string.Format("client-{0}.p12", "test"); //location of the cert string[] certPath = { @"C:\Temp\client_cert", filename }; //create a x509 cert with filepath and password of the cert X509Certificate2 certificate = new X509Certificate2 (Path.Combine(certPath), "myPassword"); //get the serial number String serialHex = certificate.SerialNumber; Console.WriteLine ($"{serialHex}"); } } } } |
One can the simply run the command below to view the serial, and example show below.
|
|
>dotnet run 0087C63C2814361739F338487C404BA3FB |
Now lets say you need the serial to find the cert to communicate with another service you can use the code below to find the cert by serial number, and create a rest client to your api like below.
1 2 3 4 5 6 7 8 9 10 11 12 13 14 15 16 17 18 19 20 21 22 23 24 25 26 27 28 29 30 31 32 33 34 35 36 |
public static X509Certificate2 GetClientCertificate(string clientCertificateSerialNumber) { X509Store store = null; try{ // Open the Local Machine -> Personal Store store = new X509Store(StoreName.My, StoreLocation.LocalMachine); store.Open(OpenFlags.ReadOnly); var certEnm = store.Certificates.GetEnumerator(); // Iterate through the certificates looking for a match while (certEnum.MoveNext()) { if (certEnum.Current != null && string.Equals(certEnum.Current.SerialNumber, clientCertificateSerialNumber, StringComparison.InvariantCultureIgnoreCase)) { return objEnum.Current; } } } catch { return null; // We could not find a matching cert } finally{ if (store != null) { store.Close(); } // Close the store } return null; // We could not find a matching cert } public static Main(string[] args){ RestClient client = new RestClient { BaseUrl = new Uri("https://someservice.com"), ClientCertificates = new X509CertificateCollection { GetClientCertificate("0087C63C2814361739F338487C404BA3FB") }; }; //do something with the client } |
View X509 Certificate Serial Number using Python
For Python I usually create a virtual env before I start coding in python such that I have a separate environment for all my library needs.
To create the virtual env one will need virtualenv installed, you can look at my other Python example of how to install virtualenv and virtualenv-wrapper for windows.
To create a virtual env type the following into your command prompt inside of vscode.
|
|
PS C:\Users\Taswar\Documents\GitHub\pythoncerts> mkvirtualenv cert_serial Using base prefix 'c:\\program files (x86)\\python36-32' New python executable in C:\Users\Taswar\Envs\cert_serial\Scripts\python.exe Installing setuptools, pip, wheel...done. |
The above command has create the virtual env but not enabled it yet, in order to enable we need to activate it.
|
|
PS C:\Users\Taswar\Documents\GitHub\pythoncerts> C:\Users\Taswar\Envs\cert_serial\Scripts\activate.ps1 //location of the activate script (cert_serial) PS C:\Users\Taswar\Documents\GitHub\pythoncerts> setprojectdir . "C:\Users\Taswar\Documents\GitHub\pythoncerts" is now the project directory for virtualenv "C:\Users\Taswar\Envs\cert_serial" "C:\Users\Taswar\Documents\GitHub\pythoncerts" added to C:\Users\Taswar\Envs\cert_serial\Lib\site-packages\virtualenv_path_extensions.pth |
Now we can install the package that we need for getting more certificate information, we will use pip and the package is pyopenssl.
1 2 3 4 5 6 7 8 9 10 11 12 13 14 15 16 17 18 19 20 21 22 23 24 25 |
(cert_serial) PS C:\Users\Taswar\Documents\GitHub\pythoncerts> pip install pyopenssl Collecting pyopenssl Downloading https://files.pythonhosted.org/packages/01/c8/ceb170d81bd3941cbeb9940fc6cc2ef2ca4288d0ca8929ea4db5905d904d/pyOpenSSL-19.0.0-py2.py3-none-any.whl (53kB) 100% |████████████████████████████████| 61kB 301kB/s Collecting cryptography>=2.3 (from pyopenssl) Downloading https://files.pythonhosted.org/packages/50/18/9edd52137e86ee4d4b1f85a34a840932d1af535c2dacd7bae100b66ae949/cryptography-2.5-cp36-cp36m-win32.whl (1.3MB) 100% |████████████████████████████████| 1.3MB 1.0MB/s Collecting six>=1.5.2 (from pyopenssl) Downloading https://files.pythonhosted.org/packages/73/fb/00a976f728d0d1fecfe898238ce23f502a721c0ac0ecfedb80e0d88c64e9/six-1.12.0-py2.py3-none-any.whl Collecting cffi!=1.11.3,>=1.8 (from cryptography>=2.3->pyopenssl) Downloading https://files.pythonhosted.org/packages/05/3f/abc53d8f0c7362181d809c913c2b348e41c193eff84c2f0445da2b615f69/cffi-1.11.5-cp36-cp36m-win32.whl (155kB) 100% |████████████████████████████████| 163kB 834kB/s Collecting asn1crypto>=0.21.0 (from cryptography>=2.3->pyopenssl) Downloading https://files.pythonhosted.org/packages/ea/cd/35485615f45f30a510576f1a56d1e0a7ad7bd8ab5ed7cdc600ef7cd06222/asn1crypto-0.24.0-py2.py3-none-any.whl (101kB) 100% |████████████████████████████████| 102kB 798kB/s Collecting pycparser (from cffi!=1.11.3,>=1.8->cryptography>=2.3->pyopenssl) Downloading https://files.pythonhosted.org/packages/68/9e/49196946aee219aead1290e00d1e7fdeab8567783e83e1b9ab5585e6206a/pycparser-2.19.tar.gz (158kB) 100% |████████████████████████████████| 163kB 1.1MB/s Building wheels for collected packages: pycparser Building wheel for pycparser (setup.py) ... done Stored in directory: C:\Users\Taswar\AppData\Local\pip\Cache\wheels\f2\9a\90\de94f8556265ddc9d9c8b271b0f63e57b26fb1d67a45564511 Successfully built pycparser Installing collected packages: six, pycparser, cffi, asn1crypto, cryptography, pyopenssl Successfully installed asn1crypto-0.24.0 cffi-1.11.5 cryptography-2.5 pycparser-2.19 pyopenssl-19.0.0 six-1.12.0 (cert_serial) PS C:\Users\Taswar\Documents\GitHub\pythoncerts> |
Now we can code it up to view the required X509 certificate serial number.
|
|
from OpenSSL import crypto import os file = "client-test.p12" cert_file = os.path.join(os.path.sep, 'Temp', 'client_cert', file) #I am using a p12 file here thus loading with using the pkcs12 method cert = crypto.load_pkcs12(open(cert_file, 'rb').read(), "mypassword").get_certificate() serial = cert.get_serial_number() serial_hex = '{0:#0{1}x}'.format(serial, 4) print(serial_hex) |
When you run the script it will output something like this
|
|
>python cert_serial.py 0x87c63c2814361739f338487c404ba3fb |
Summary
Above are two examples of getting x509 certificate information specifically serial number, there are additional information that one can view, just check out the api documentation.
One additional thing I found is in python it does not show me the leading 00 of a certificate but C# is able to show that.


