Taswar Bhatti
The synonyms of software simplicity
VsCode-Python-Flask

Visual Studio Code with Python Flask

I wanted to continue on my python exploration and show how to get started with Visual Studio Code with Python Flask.
What is flask you may ask

Flask is a microframework for Python based on Werkzeug, Jinja 2 and good intentions. And before you ask: It’s BSD licensed!

Basically you can think of Flask somewhat like NancyFx or Sinatra web framework.

First thing first, in python we should set up our virtualenv such that we have a dev environment and don’t pollute our global space with our packages. You should already have pip install with your python if you are using the Python 3.x series.

Open up your powershell or command prompt and type

Once you have virtualenv we will need virtualenvwrapper-win since we are running under windows.

Now we need to create the virtualenv that we will be using.

This will create your virtualenv inside your home directory for mine it is under

In order to activate the virtualenv we need to use the activate.ps1 script but you must make sure we have the correct execution-policy in your powershell but before we do that lets launch our Vscode

Lets now set up our directory to use the virtualenv, remember the Set-ExecutionPolicy for powershell and use the terminal inside your vscode with Ctrl+Shift+` (right tick)

Lets now install flask

Lets now create a hello.py example of flask application, remember spaces are important for python

Go back to your powershell prompt and enter. (NOTE: you may need to restart vscode for this to work)

When everything is up and running you should be able to go to Chrome or your favourite browser and view port 5000 and see Hello world there.
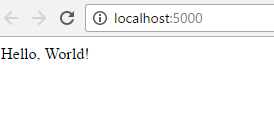
VsCode-Python-Flask-1

VsCode-Python-Flask-1

Hope this helps you in setting up vscode with development of Python Flask.

To learn about running VSCode with python read my previous post on Getting Started with Visual Studio Code with Python.


VsCode-with-Python

Visual Studio Code with Python

Visual Studio Code is the new kid on the block and it has lots of bells and whistle including using Visual Studio Code with Python.

Requirements

To install vscode, just go Visual Studio Code website. Its a very simple click through process if you are using Windows.

If you are using Linux, then you will need to download the .deb package and use the command to install it, replace the filename below.

The other requirement is to download python, again its a simple process if you are using Windows, just click through. I wont go through the python install process. Just go through Python Download section. I personally use the 3.x series, since I like being latest 🙂

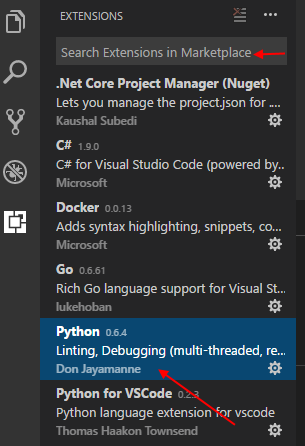
Once you have visual studio code installed you can launch vscode and click on extension tab and search for python.

vscode-python-1

vscode-python-1

I use the Don Jayamanne Python extension, and then click on install.
vscode-python-2

vscode-python-2

Once the plugin is installed you can reload vscode.

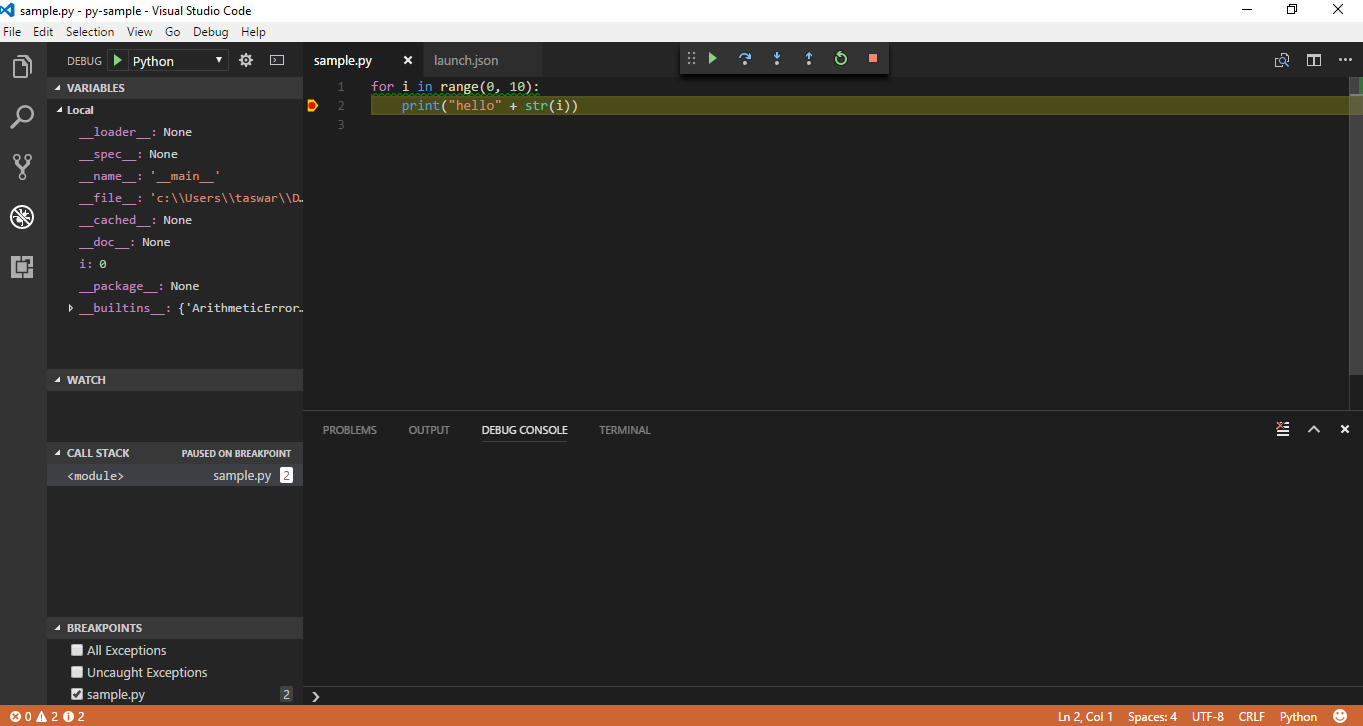
Open up a new file and name it sample.py and type the following code into it. Remember spaces in python are important

We can then click on the debug tab and debug the python code, lets put a breakpoint in the print statement, one can also add a Python configuration. When you debug you will be able to see your variables values also like below.

vscode-python-3

vscode-python-3

Hope this will help you in getting python running in VsCode.

fakerjs

Last time I did a sample app to generate large amount of data using GenFu in C# so that I can be in .NET land but I wanted to also try out what it would be like to generate fake data in node.js using VSCode.

My investigation lead me to Faker.js, which would allow me to generate fake data in Node.js with Faker.js

Installation

To install faker.js you just need to use npm package manager

Usage

I will use a similar kind of example I had used previously to generate logs, below is the sample code I used to generate, it is a bit different but the idea is the same.

As you can see faker.js is also quite easy to use and generate fake data, although in GenFu we were able to generate a List of objects, I was not able to find such functionality in faker.js but one nice thing faker.js had was localization where it can generate data in different languages.

Faker.js also has quite a few api methods to generate data take a look at their github page for all the methods https://github.com/marak/Faker.js/.

Check out faker.js if you are using node.js and need to generate large amount of fake data.

Redis

Redis List Datatype are similar in C# world as LinkeList e.g LinkedList. Just like in LinkedList in C#, Redis can store items at Head or Tail of a List. The nice thing about them is that the insertion speed is just O(1), but do note that if you have a large list, the reading speed goes down since it sequentially traverses through the items (i.e walking down the chain). One could also say its an advantage since Redis was made to write faster than read, and LinkedList are great data type for such things. List are ideal candidate for logs, since the write speed is more important than read when dealing with logs.

Redis List Datatype – Operations

  • LPUSH: Prepends the values to the left of the list O(1).
  • RPUSH: Prepends the values to the right of the list O(1).
  • LPUSHX: Prepends the values to the left of the list if key exist O(1).
  • RPUSHX: Prepends the values to the right of the list if key exist O(1).
  • LINSERT: Inserts a value in the list after position calculated from left O(N).
  • LSET: Sets the value of an element in a list based on index O(N).
  • LRANGE: Gets the sub list of elements based on start and end position O(S+E).
  • LTRIM: Deletes the elements outside the range specified O(N), where N is the length.
  • RPOP: Removes the last element O(1).
  • LREM: Removes the element at the index point O(N) , where N is the length.
  • LPOP: Removes the first element of the list O(1).
  • LINDEX: Gets the element from the list based on the index O(N) where N is the length of traverse.
  • LLEN: This command gets the length of the list O(1).
  • RPOPLPUSH: Operates on two lists source and destination list, takes the last element on the source list and push it to the first element of the destination list O(1).

C# code using Redis List Datatype

So this covers the basic usage of Redish List Datatype, in the next blog post I will cover using Sets Datatype.

For the code please visit
https://github.com/taswar/RedisForNetDevelopers/tree/master/5.RedisList/RedisList

For previous Redis topics

  1. Intro to Redis for .NET Developers
  2. Redis for .NET Developer – Connecting with C#
  3. Redis for .NET Developer – String Datatype
  4. Redis for .NET Developer – String Datatype part 2
  5. Redis for .NET Developer – Hash Datatype
Redis

I wanted to cover some security aspect of Redis, using Redis Password feature. Redis uses config file to provide a password for it. The config file is usually located at /etc/redis/redis.conf if you are using linux. Look for the SECURITY section.

If you are using docker you can set the option when you start the docker container.

Afterwards if you are trying to connect to redis using redis-cli you will not be able to launch any commands in it,

In order to set the value x, one will need to authenticate

If you are using StackExchange.Redis you can use the sample code below to connect, as you can see I am just adding the password to the connection string.

For other Redis topics

  1. Intro to Redis for .NET Developers
  2. Redis for .NET Developer – Connecting with C#
  3. Redis for .NET Developer – String Datatype
  4. Redis for .NET Developer – String Datatype part 2
  5. Redis for .NET Developer – Hash Datatype
  6. Redis for .NET Developer – Redis running in Docker
  7. Redis for .NET Developer – Redis running in Azure
  8. Redis for .NET Developer – Redis running in AWS ElastiCache
dotnet-core-with-GenFu

dotnet core with GenFu

Couple of weeks ago I had to test out the performance of a third party product but in order to test we had to use a lot of logs that would feed into the system. The requirements was to pump out around 1000 logs per seconds and feed into the system.

As you know I am a .NET fan wanted to write this small program in dotnet core C# and was looking for a library that would generate me some fake data but something realistic at the same time. I found GenFu developed by James and Dave, 2 fellow Canadian Microsoft MVP.

The description of GenFu is provided below:

GenFu is a library you can use to generate realistic test data. It is composed of several property fillers that can populate commonly named properties through reflection using an internal database of values or randomly created data. You can override any of the fillers, give GenFu hints on how to fill them.

Installation of GenFu

GenFu comes in NuGet package thus the installation process is as simple as

Usage

My usage was quite simple to generate log files. Thus I started by creating an Object that would contain all my data.

GenFu provides an easy way to fill the data like below

But my requirements had certain criteria and GenFu allows you to use Fillers (PropertyFiller) to fill in data to your needs i.e a way to override its default values. In my case I wanted to override multiple fields, an example below of override of TenantName

With the code above and the setup I was able to generate data that was very realistic to my needs. GenFu also provides Fill to add Ranges to your data or Email addresss like below:

Thanks to GenFu I was able to create some interesting and realistic data to feed into the system. Do check out the library 🙂

Redis-running-in-AWS-ElastiCache

I wanted to go through the process of Redis running in AWS ElastiCache, since we have already covered Docker, Azure and plain vanilla Redis on Linux Server. Redis in AWS is under the umbrella of ElastiCache, where they offer Redis and Memcached.

There are different type of nodes offered by AWS ElastiCache:

  • Standard
  • Memory Optimized

I wont be going through the AWS offering, since AWS ElastiCache does a good job in explaining the differences between the Nodes.

First you will need to login to your AWS console, once logged in.

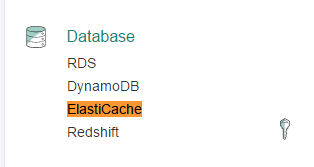
  1. Click on the Database Section of ElastiCache
    AWS-ElastiCache

    AWS-ElastiCache

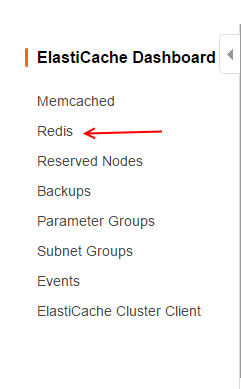
  2. Select the Redis option on the Dashboard Menu
    AWS-ElastiCache-2

    AWS-ElastiCache-2

  3. Click on Create
    AWS-ElastiCache-3

    AWS-ElastiCache-3

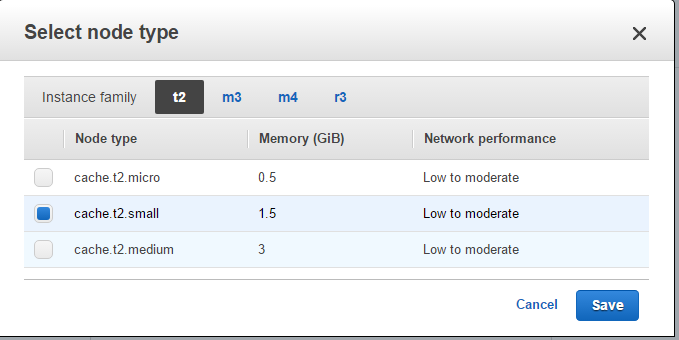
  4. Select the node that you wish to use. Here I am just selecting small, but feel free to choose which one serves you the best.
    AWS-ElastiCache-4

    AWS-ElastiCache-4

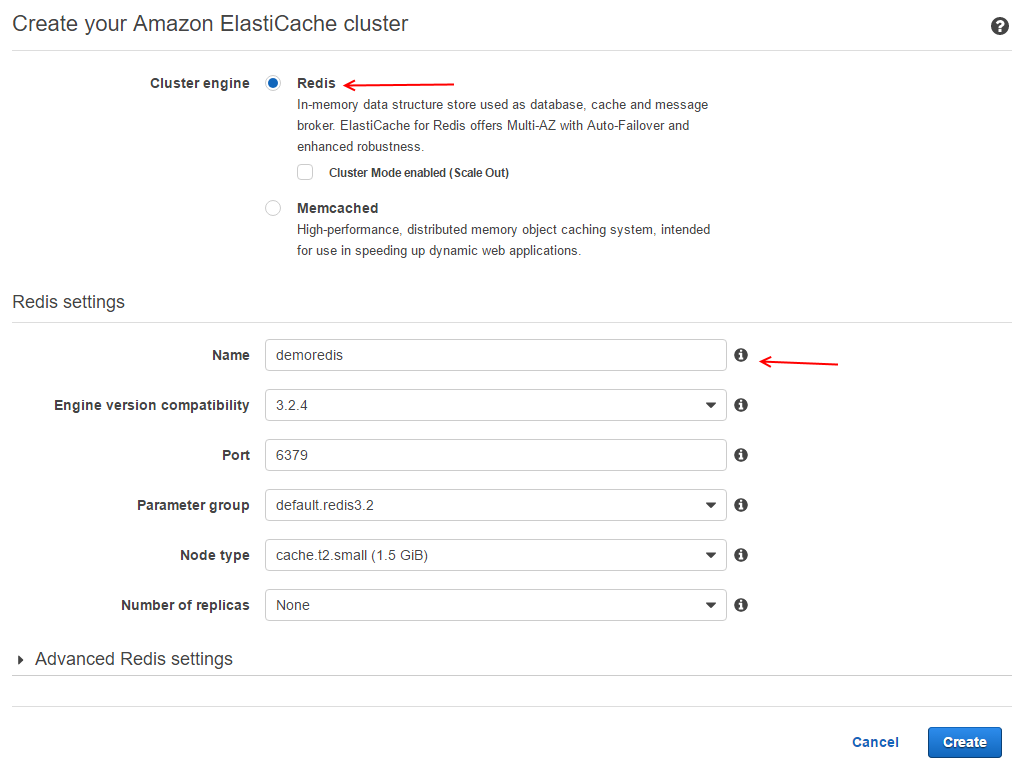
  5. Select Redis and fill in the Name of the cluster and click Create.
    AWS-ElastiCache-5

    AWS-ElastiCache-5

  6. The process takes couple of minutes and will complete
    AWS-ElastiCache-6

    AWS-ElastiCache-6

  7. Once complete you will have a AWS domain name to connect to your Redis
    AWS-ElastiCache-7

    AWS-ElastiCache-7

AWS does not have the option to see ElastiCache Redis running within its Console like Azure, but one can connect to the endpoint the same way you connect to any Redis instance. As we saw there is a default hostname that is given by AWS to connect to, there is no secret/key pair provided like Azure. The access to the ElastiCache Redis instance is configured through AWS Security Groups, just like connecting to your RDS, EC2 instance.

There are two important items to note when running AWS ElastiCache with Redis:

  1. One cannot set password on the Redis instance. Any EC2 instance in the same security group will have access to your Redis instance.
  2. Connection to the ElastiCache instance is only within the region/VPC

When using StackExchange.Redis you can connect to the Redis instance, the information to connect to AWS ElastiCache is located in the AWS Console under your Redis instance running, one can use the sample code below to connect. (Note: AWS uses Security Group to connect)

For other Redis topics

  1. Intro to Redis for .NET Developers
  2. Redis for .NET Developer – Connecting with C#
  3. Redis for .NET Developer – String Datatype
  4. Redis for .NET Developer – String Datatype part 2
  5. Redis for .NET Developer – Hash Datatype
  6. Redis for .NET Developer – Redis running in Docker
  7. Redis for .NET Developer – Redis running in Azure
redis-azure

In this post I wanted to go through the process of Redis running in Azure. Redis in Azure is called Azure Redis Cache. Azure offers a secure access to a dedicated Redis cache, which allows you to connect from any Azure applications.

There are certain tiers that are offered in Azure Redis:

  • Basic
  • Standard
  • Premium

I wont be going through each of them, since Azure does a good job in explaining the differences between the tiers but for this post we will be using the Basic.

First you will need to login to your Azure portal.
Once logged in.

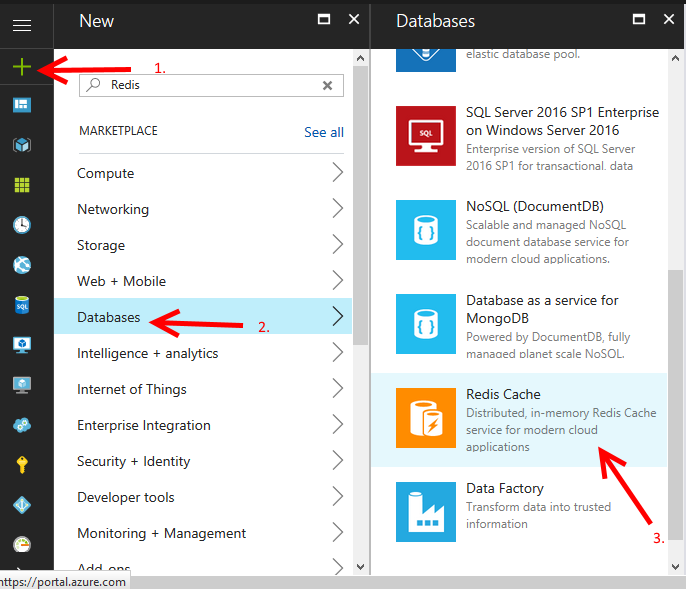
  1. Click on New (+) sign, and it will open up the New Section
  2. Select the Databases option
  3. Select Redis Cache
    redis-azure1

    redis-azure1

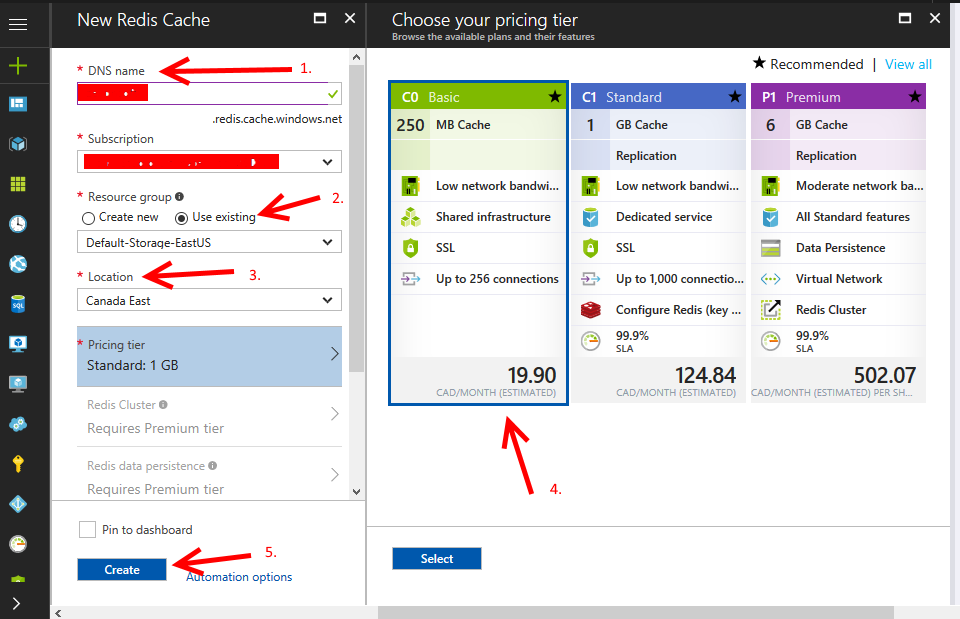
Once you have selected the right option, then it is just 5 clicks away to create Redis

  1. Select a DNS name that is not used.
  2. Select your Resource Group.
  3. Select your Location.
  4. Select your pricing tier (I have selected Basic here, but feel free to choose the one that satisifies your needs)
  5. Click on Create.
    redis-azure2

    redis-azure2

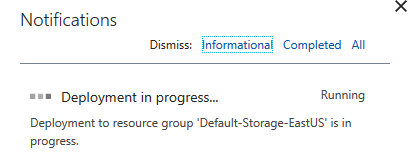
  6. It takes a bit of time to create it, but you can see the progress.
    redis-azure3

    redis-azure3

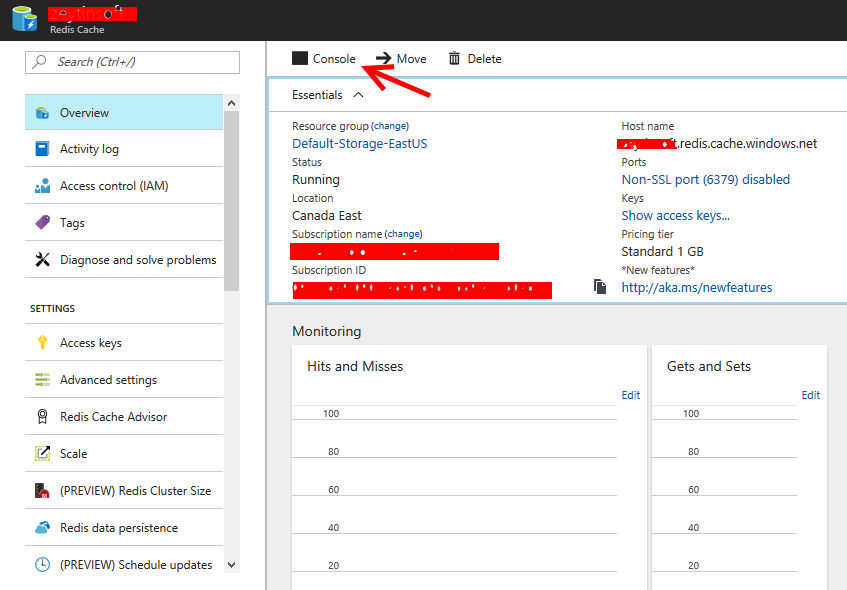
One can access Redis using access keys and one can test it by launching the console.

Azure-Redis-Cache

Azure-Redis-Cache


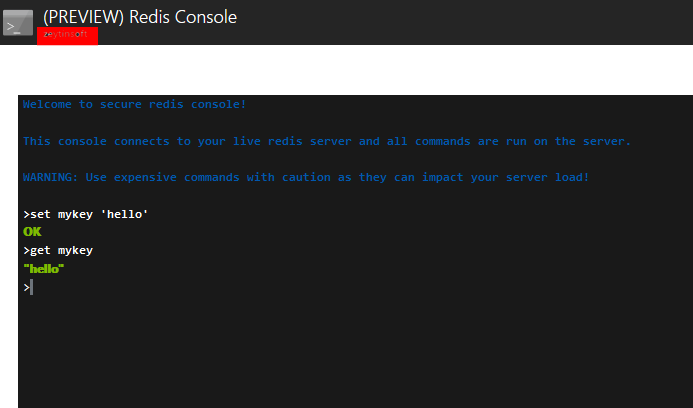
The Console allows one to use Redis commands.
Azure-Redis-Preview-Console

Azure-Redis-Preview-Console

When using StackExchange.Redis you can connect to the Redis instance, the information to connect to Azure is located in the Azure portal under Settings > Properties, one can use the sample code below to connect.

For other Redis topics

  1. Intro to Redis for .NET Developers
  2. Redis for .NET Developer – Connecting with C#
  3. Redis for .NET Developer – String Datatype
  4. Redis for .NET Developer – String Datatype part 2
  5. Redis for .NET Developer – Hash Datatype
  6. Redis for .NET Developer – Redis running in Docker
redis-docker

To get Redis running in Docker is quite easy. The windows installation follows but if you on the Linux platform, first you will need to install docker. Docker has very good documentation on how to get docker running on Linux. I personally use Ubuntu so would suggest you to give Ubuntu a try for Docker.

Once docker is installed, all it takes from command prompt is to run

Then to run redis

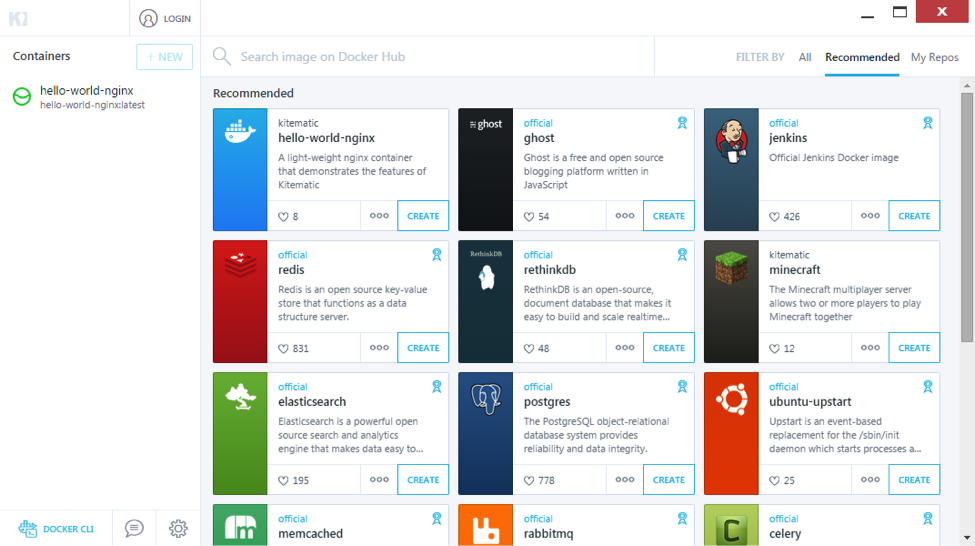
If you are on the windows 10 installing Docker is also a breeze platform, and to install Redis you can use Kitematic.

The steps to install Redis with Kitematic.

  1. Launch Kitematic
    kitematic-windows

    kitematic-windows

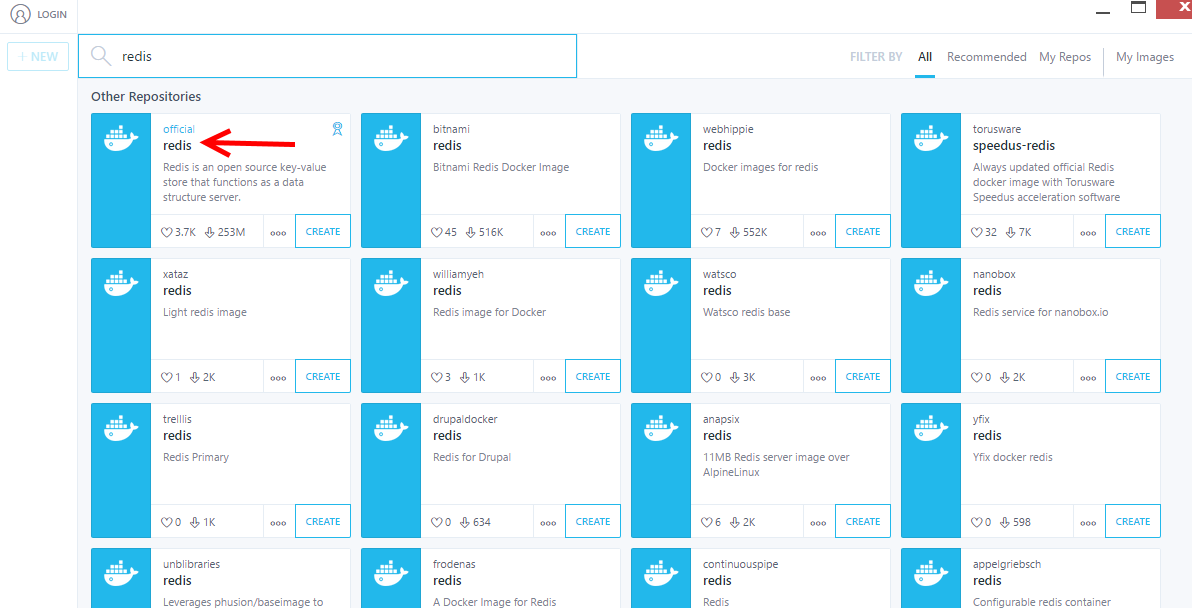
  2. Search for Redis
  3. Install the official release of redis by clicking on Create
    docker-redis-2

    docker-redis-2

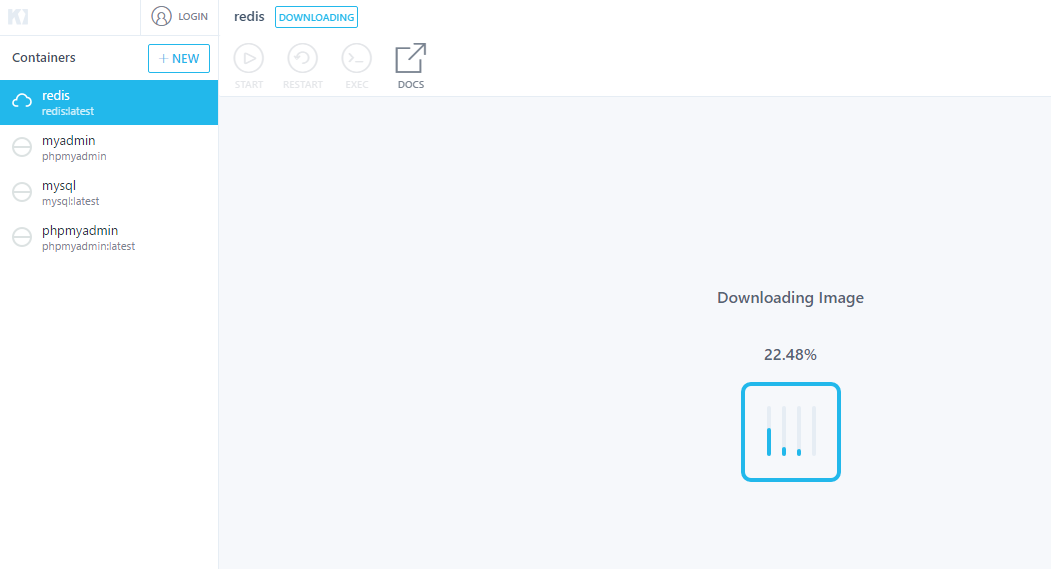
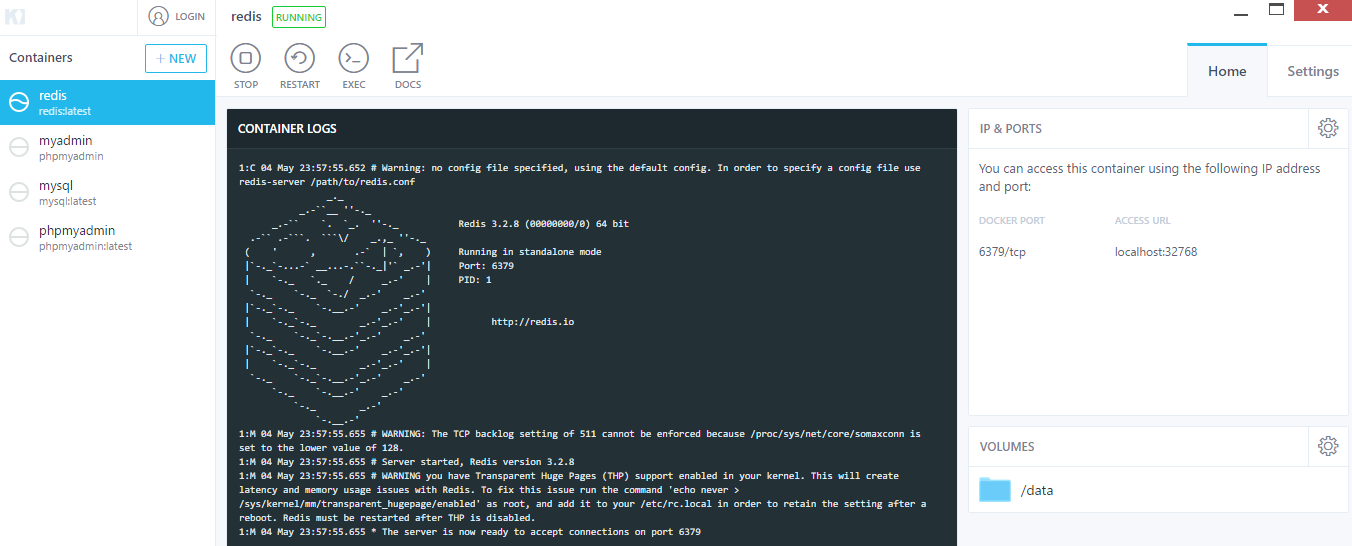
  4. Done
    docker-redis-3

    docker-redis-3

Now one can connect to localhost port 32768 with Redis. Docker makes it super easy to get Redis up and running.

For other Redis topics

  1. Intro to Redis for .NET Developers
  2. Redis for .NET Developer – Connecting with C#
  3. Redis for .NET Developer – String Datatype
  4. Redis for .NET Developer – String Datatype part 2
  5. Redis for .NET Developer – Hash Datatype
  6. Redis for .NET Developer – List Datatype
  7. Redis for .NET Developer – Redis Sets Datatype
  8. Redis for .NET Developer – Redis Sorted Sets Datatype
  9. Redis for .NET Developer – Redis Hyperloglog
  10. Redis for .NET Developer – Redis Pub Sub
Redis

Redis Hash Datatype are similar in C# world as Dictionary e.g Dictionary<string, string>. Just like in C# redis stores map of attributes using key value pair. One thing to note is in Redis a Hash both the field name and the value are strings. Therefore, a Hash Datatype is a mapping of a string to a string.

Memory Optimized

Redis Hashes are memory-optimized. Their optimization is based on the hash-max-ziplist-entries and hash-max-ziplist-value configurations. Internally in Redis, a Hash can be a ziplist or a hash table. So what does it mean for a ziplist? Basically it is designed to be memory efficient dually linked list and integers are stored as real integers rather than a sequence of characters.

Speed

Something to note is a hashtable in Redis has a constant time lookup, the down side is it is not memory optimized, while the ziplist is memory optimized but the lookup time are not constant. To read more on Redis Memory Optimization please view Redis documentation.

So which one is used when?

  • The ziplist is by default when the number of fields do not exceed the configuration ones in hash-max-ziplist-entries
  • The hashtable is used when a the size or any of its values exceeds

Redis Hash Datatype – Operations

  • HSET: Sets the value of a field for a key O(1).
  • HGET: Gets the value of a field for a key O(1).
  • HLEN: Gets the number of fields for the key O(1).
  • HMGET: Gets the values for the fields for a key O(N), where N is the number of fields and O (1) if N is small.
  • HMSET: Sets multiple values for respective fields for a key O(N), where N is the number of fields and O (1) if N is small.
  • HGETALL: Gets all the values and fields for a key O(N). Where N is the size of the hash
  • HKEYS: Gets all the fields in the Hash for the key O(1).
  • HEXISTS: Checks for the existence of a field for a key O(1).
  • HVALS: Gets all the values in the Hash for the key O(N), where N is the number of fields and O(1) if N is small.
  • HSETNX: Sets the value against the field for the key provided the field does not exist O(1).
  • HDEL: Deletes the fields for a key O (N), where N is the number of fields and O(1) if N is small.
  • HINCRBY: Increments the value (provided the value is an integer) of a field for a key O(1).
  • HINCRBYFLOAT: Increments the value if value is a float of a field for a key O(1).

C# code using Redis Hash Datatype

For the code please visit
https://github.com/taswar/RedisForNetDevelopers/tree/master/4.RedisHashes

So this covers the basic usage of Redish Hash Datatype, in the next blog post I will cover using List Datatype.

For previous Redis topics

  1. Intro to Redis for .NET Developers
  2. Redis for .NET Developer – Connecting with C#
  3. Redis for .NET Developer – String Datatype
  4. Redis for .NET Developer – String Datatype part 2
UA-4524639-2