Taswar Bhatti
The synonyms of software simplicity
Grunt

In this post I will cover some area of grunt more of a grunt basic tutorial, things you can do with grunt, in previous post we saw how we use grunt with Visual Studio 2012 and 2013 and our simple hello world task.

Let’s start with some more basic things e.g writing a simple function task that takes a parameter.
For example below we have a hello task that takes a parameter of name.

Note: we are using : to pass in parameters, if you have multiple parameters you can chain it with more colon (e.g grunt hello:Taswar:123456 ) it will pass it into the second parameter.

We can also provide a warning message when a parameter is not passed.

Now what if we want to chain the task together, hello and hello2, we can register a task for it

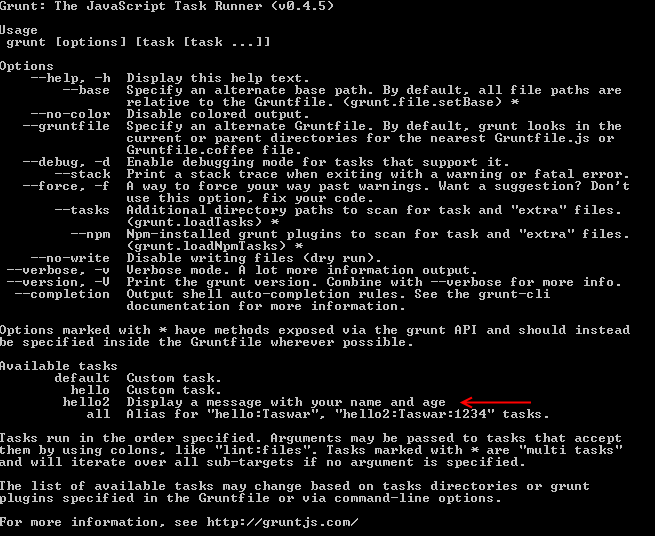
So far so good, but we can also document our task so that anyone using our task will have some description of the task.

If we run the grunt -h command we will see something like

GruntHelp

GruntHelp

So far we have covered more of the basics of grunt, the next blog post I will cover more in details of manipulating files etc in your system using grunt.

Grunt

Visual Studio 2013 provides Task Runner Explorer for us to run Grunt & Gulp task right inside of Visual Studio.
One can download Task Runner Explorer from Visual Studio Gallery

Once installed we can now use npm to install grunt for us in our node web project.

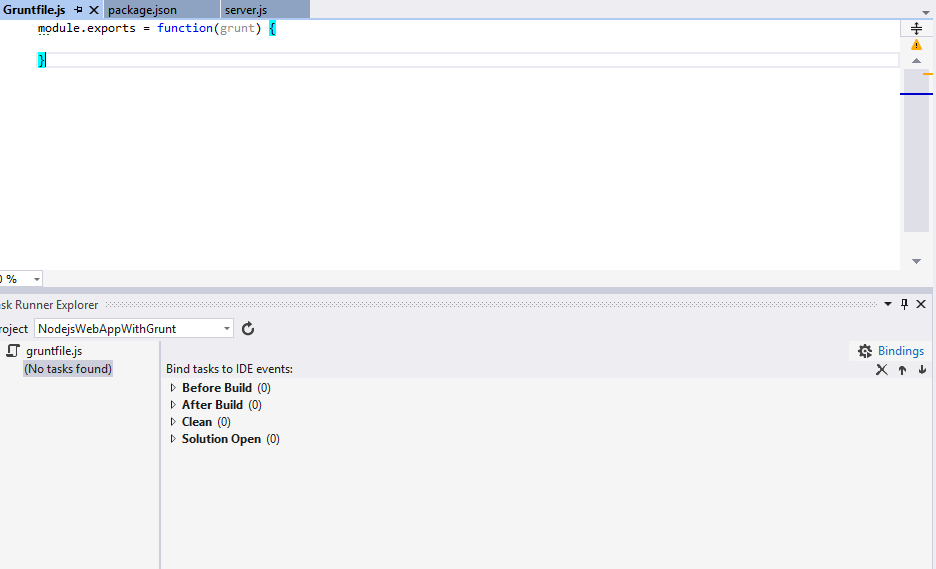
We now will create a new Gruntfile.js and also launch our task runner explorer (View > Other Windows > Task Runner Explorer), as you can see we don’t have any task yet so there is no task to run.

Visual Studio Task Runner

Visual Studio Task Runner

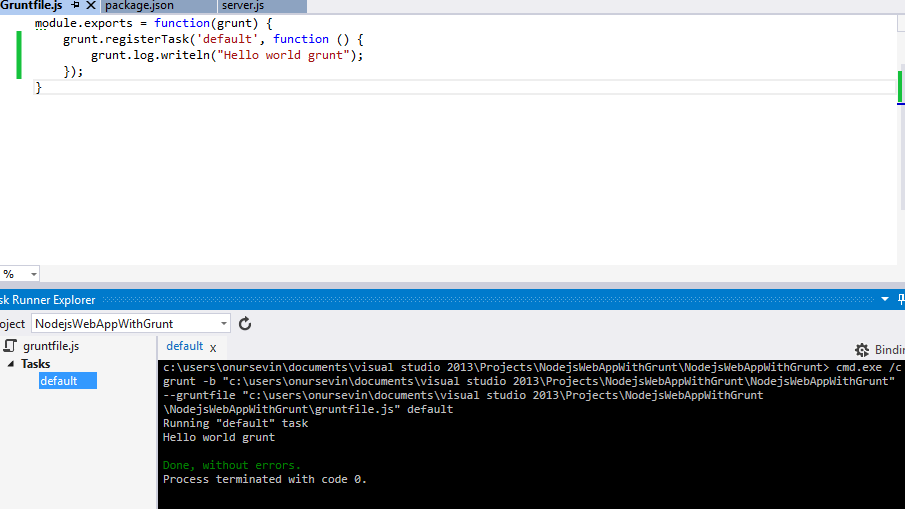
We will now add our hello world task

From there we will need to click on the reload button on task runner and it will now contain our default task.

Lets try to run the default task and see how it looks like

Vs Grunt Task Runner

Vs Grunt Task Runner

In my next blog post I will show how we will use Grunt to concat (join) some files together and continue on our journey with Task Runner Explorer in Visual Studio 2013.

Connect
Me and Anders

Me and Anders Hejlsberg (Creator of C# & TypeScript)

I just got back from MVP summit from Seattle, and there were lots of new and cool stuff about the future of .NET and web development with vNext. I would strongly to suggest that you join the virtual developer Microsoft conference Connect(); http://www.visualstudio.com/en-ca/connect-event-vs

On the 12th you will have keynotes from Scott Gu, Scott Hanselman and Soma. There will also be session with product team on the 13th.

Unfortunately, I cannot reveal anything at this moment due to NDA but here is a video of ASP.NET vNext Insider for anyone interested in ASP .NET vNext.

Grunt

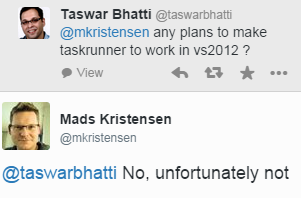
In this post I will show how to use Grunt Launcher in Visual Studio 2012, there is also Task Runner but it only works in Visual Studio 2013, and there are no plans to making it to work in 2012. 🙁

nosupport

No worries since there is Visual Studio Grunt Launcher that one can use in Visual Studio 2012.

First you need to get over and download and install Grunt Launcher, go ahead and I will wait here till the install process finish.

Ok done ? Lets continue and make a new node project.

Create a Node app, and launch the npm package manager by right clicking on the project.
Nodeapp

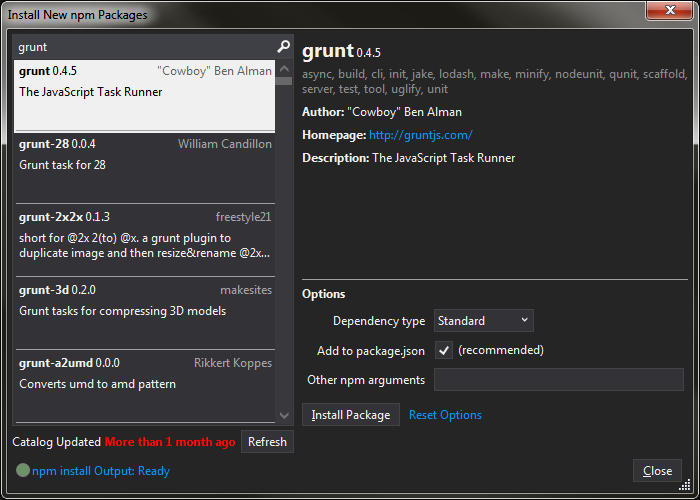
Search and install grunt from the npm console.
npmconsole

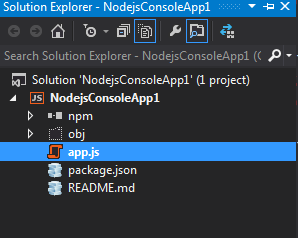
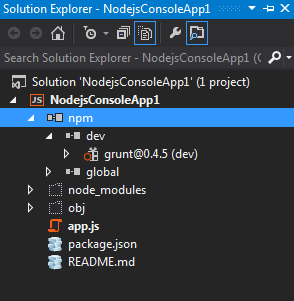
We can verify that grunt is installed by expanding the npm folder in our solution. As shown below we have installed as a dev dependency.
solutionexplorer

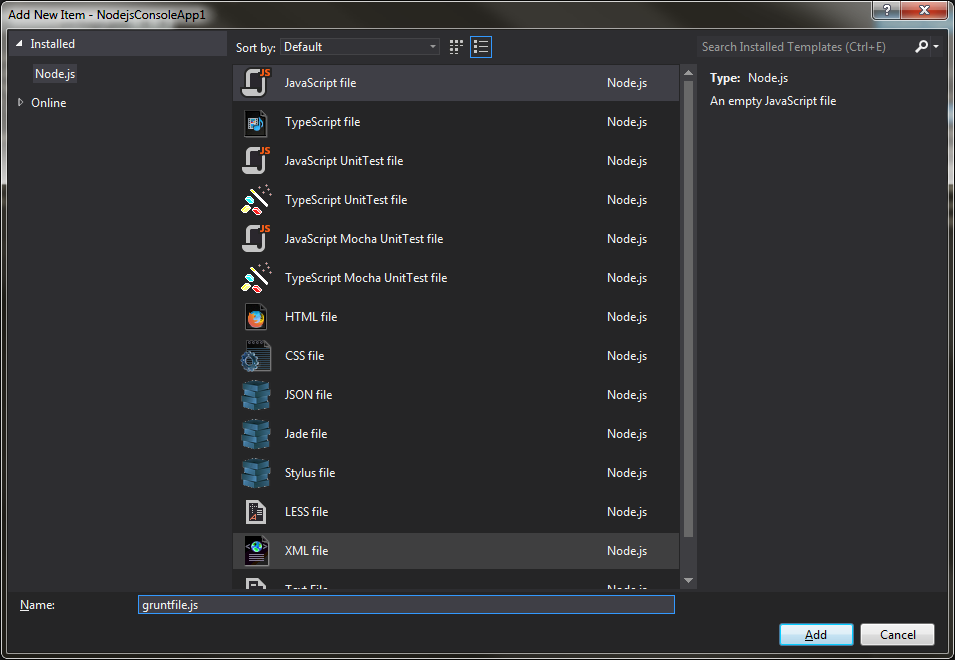
Once we are done we can now add our grunt file that will have all our grunt task.
addgruntfile

In our grunt file we will add a simple hello world task like below

Right click on the npm icon in the project solution and you will get the context of grunt, from there one can choose the task they wish to execute. The out out is shown in the output window.
output

Warning: If you have WebEssentials installed this may not work , if that is the case you can always execute using your command prompt. Right click on your project and “Open Command Prompt Here…”, type grunt in the command prompt it will run the default task for you.

If we add another task inside the gruntfile like below we will be able to run the grunt command with the name of the task

In my next blog post I will continue on grunt and explain more in details of task you can complete with using grunt.

Grunt

So what is Grunt?

Grunt is a task-based command line build tool for JavaScript projects.

If you are in the .NET world you may have written some bat files to automate some task, e.g copy some files from one directory to the other. Or have used Psake or MSBuild

And if you come from the Ruby world then you may been using rake, in C and C++ Makefile or Java ant or maven. Basically Grunt is just like those tools that allow you to automate tasks.

A sample Makefile

Ok great, I get the point Makefile, good for blah blah, now what can I do with using Grunt tool you are talking about?

Be patient, grasshopper. Let say you need to minify your JavaScript, run JSHint on your code, running some mocha tests after changes in your files, or reload node express server, or package your plugin etc, that is where Grunt comes in, and gives you a hand to automate things. Just like your MSBuild that helps you compile your code to helloworld.exe

So what is Grunt good for?

  • To automate task for you
  • To build small to large projects
  • To deploy code
  • To run your web server

Installing Grunt

We will install the Grunt CLI, this will install the command line utility globally. Grunt is broken into separate packages, by installing grunt-cli it does not automatically install grunt for us, all it does is allow us to use the command-line interface. In a typical workflow the CLI is installed once per system (i.e globally like below), and grunt is installed once per project.

Now lets create our own sample project and initialize npm in it, so that it creates package.json file for us.

Now that we have that in place we will install grunt as a development dependency.

Now if we type in grunt in the command we will see an error.

A valid Gruntfile could not be found. Please see the getting started guide for
more information on how to configure grunt: http://gruntjs.com/getting-started
Fatal error: Unable to find Gruntfile.

What we need to do is create a file called Gruntfile.js, so lets create a file in our directory, and have a hello world message registered for our default task

Now when we run grunt we will have an output

Running “default” task
Hello world grunt

Done, without errors.

Summary

We have covered installing and using Grunt in a very simple “hello world” way, in my next blog I will cover Visual Studio 2013 task runner tool that allows you to run grunt task inside of Visual Studio, and I will cover more in details of using grunt.

failure

“Success is not final, failure is not fatal: it is the courage to continue that counts.”
― Winston Churchill

Here is an experience of a failure that I wish to share with everyone. Recently I had an interview with a company (large travel company), and the interview went well until the technical question came along.

Now don’t get me wrong I did prepare for the interview, and did lots of questions (since I was expecting a hard interview):

1. Find if a subtree exist in a million node of a Binary Tree
2. Finding circular links in link list
3. Least common ancestor in a tree
4. Path between 2 nodes in a trees
5. Sum up tree nodes
6. Anagram in text
7. Practice my quicksort and mergesort
8. Wrote my own LRUCache, hastable (hashing function) etc how it works
9. Sql joins etc etc

Basically did most of career cup stuff.

And here is the thing, when the technical question was asked it was in fact a very simple one, and due to the fact that I over-prepared myself and ego kicked in I though I could do better, but in the end I screwed it up. The question was a rather simple one, it could have been answered in a few lines of code. In the beginning of answering it I was heading the right direction (i.e using a hashtable NOTE: most interview questions can be answered with hashtable)
Then I started to over analyze things, and though hmm I can do this faster if I did a merge sort O(n log n), which was not the right thing to do. Not to mention my mergesort is still a bit rusty.

All in all, I felt like I just threw up on the interview, although I did verbally answer the right question at the end, when s/he asked me that “if I can have done this in a simple approach, maybe there is a simple solution ?”, and it just hit me at that moment. Yes, of course I could have used this data structure in this way, and get the right results in these 3-4 lines of code.

But that in my opinion is too late, I would not have hired myself if I was in their shoes. For most of the time overthinking is not the right approach to the problem. Even though I did write down all the requirements of the question I still critically missed something because maybe ego kicked in or maybe anxiety of it. My mind had an analysis paralysis moment also, if you wish to read more about it, Scott Hanselman has also an excellent article on Analysis Paralysis

A quote from the article

I see so many issues and possible bugs that I’ve learned over the years that could derail a feature that I end up derailing the feature.
— Scott Hanselman

The moral of the story is keep it simple and don’t try to over think in an interview or in your programming, because you will over complicate things in those circumstances (there is only a certain limit of time and most of the time interviewee like to keep it simple), don’t let the time pressure sink into you, because if you don’t focus on whats on hand, you will derail and lack the focus of the real solution which in most time is just a rather simple solution. Keep it simple stupid !!!!

conversion

In this post I will write about some tips on JavaScript Conversion from type to values etc.

Tip 1: Boolean values
In JavaScript one can use the double not (!!) to convert a variable to a Boolean. What the !! operator (poor man casting) does is, it first cast the data to a true Boolean and then it flips it, and the second operator flips it back to the correct Boolean value.

Tip 2: Convert to Number
In JavaScript one can use the + to convert a string to a number. I mean the plus can be obscure, one can also >> shift operator and also use parseInt but remember parseInt may give you different results than + like the example below. Also here is some jsperf on int casting.

Tip 3: Convert to String
This is the inverse of the + you saw above, you can covert a value into a string by concat with empty string “”. If you wish to know which one is the fastest way to cast as string one can check out this jsperf

javascript

Here is another quick tip on JavaScript, the default value in Javascript. If you are coming from the C# world you may have seen something along the line of

The above code shows the ?? for null coalescing operator in C#, don’t confused it by the generic default value. In JavaScript, there is the double pipe operator ||, where the object is null or undefined.

In the above code we have create a function call add and we have defined default values inside of the function. Learn it, love it, use it 🙂 It comes in handy to define default values.

Javascript

In JavaScript there are two types of equality operator, the === and the !== , sorry I forgot to mention their evil twin == and != .

tsdr; (too short didn’t read) Use three equals unless you fully understand the conversions that take place for two-equals.

Basically what the triple equal (===) compares is if the value is equal and if the type is equal.

Lets look at an example below.

The reason for the === operator to return false is due to the fact that it does not do type coercion, but the double == does type coercion and implicitly tries to convert the value before comparing.

Some additional examples:

I hope the examples above give you the reason to stop using == and != since it convert things for you during comparison. So start using the triple === and !== .

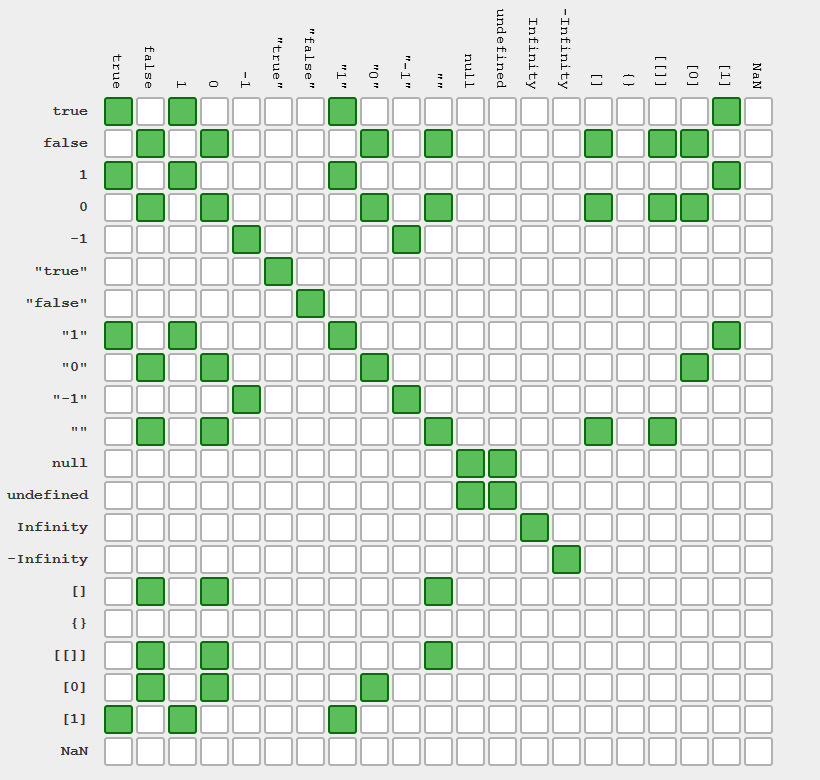
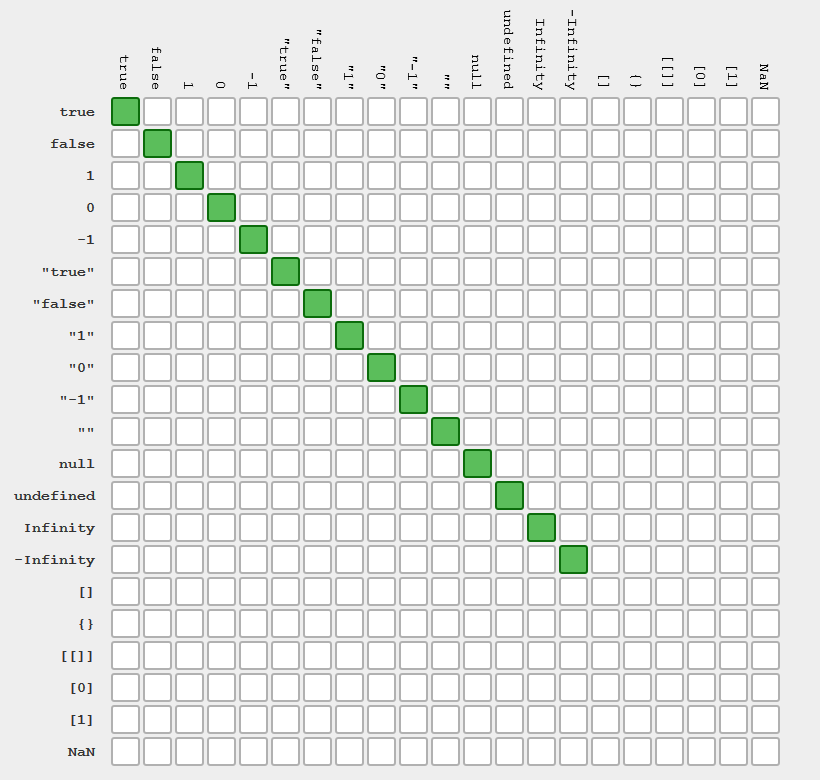
Below are two tables that show the equality of == and === provide by http://dorey.github.io/JavaScript-Equality-Table/

javascript ==

x == y

62vxI

x === y

Javascript quick tip debugger

Here is Javascript quick tip debugger for Javascript developers, there is a debugger statement in JavaScript, which invokes any available debugging functionality. e.g setting a break point, and if there is no debugging functionality available the statement has no effect.

Let’s say you wish to debug a function

One could then add a debugger; statement into the code to debug the function.

This will automatically launch the debugger in Chrome, Firefox, Opera, Safari and IE.

The debugger statement is part of EMCA script version 5.
For more information
https://developer.mozilla.org/en-US/docs/Web/JavaScript/Reference/Statements/debugger

UA-4524639-2