👋 Hi everyone! Here is another amazing video from me & Hatim Nagarwala where will introduce you to Azure Logic Apps, a cloud platform that lets you create workflows and integrate legacy systems with low code or no code. 🙌
You will discover the benefits, features, and scenarios of using Logic Apps, such as trigger based programming, business process automation, and sending status reports. 🚀
You will also see a demo of how to use Logic App to test the simple Http code and learn where to find more resources to explore Logic Apps. 💯
This video is full of tips and tricks that will help you get started with Azure Logic Apps in a snap. 😎
Don’t miss this chance to boost your cloud productivity and creativity with Logic Apps. 🙋♂️
Watch the full tutorial now and get ready to logic your way to the cloud. 🌥️
👋 Hi everyone! In this awesome video, we will go back to basics and talk about Azure Virtual Machine. 🙌
You will learn how to launch Virtual machines, what is Azure Marketplace and how you can use it to launch a VM of your choice. 🚀
You will also see a demo of launching a Windows 11 Virtual machine, with RDP access and what is being created inside of Azure when you create a VM with your Azure resources. 💯
You will also find out where the ip is created and how to configure network security and more. 😎
Don’t miss this opportunity to master Azure Virtual Machine and create your own cloud environment. 🙋♂️
Watch the full video now and get ready to virtualize your way to the cloud. 🌥️
If you’re exploring the idea of pursuing a career path with Microsoft but feeling uncertain about where to begin, we’ve got you covered. Watch our MVP’s video on Microsoft Azure learning, certifications, and career growth. Learn about role-based certs, Microsoft Learning Rooms, and cultivating a growth mindset for success. 🧑💻 To learn more: 🔗 Microsoft Learn Learning Rooms: https://techcommunity.microsoft.com/t…
MVP TechBytes – Vector Search and Azure AI Vision with Postgres. Learn about what vector similarities search is, we deep dive into cosine distance used in Vector Search, with a live demo on how to enable it in Azure using Vision Studio. 🧑💻 To learn more about vector similarity search with Azure Computer Vision Image Retrieval APIs:
Exploring Vector Similarities Search and Image Retrieval with Azure AI Vision
In today’s world, technology is advancing at an unprecedented pace, and one of the most exciting developments is in the field of artificial intelligence. One of the most popular topics in AI is vector similarities search, which allows us to explore the image retrieval functionality of the newest Azure computer vision service, now renamed to Azure AI Vision.
Foteini Savvidou, a Microsoft Most Valuable Professional in AI, joined MVP Tech Bytes to discuss this topic in depth. She explained how the image retrieval function is based on the conversion of images into vectors, called vector embeddings. These vectors are high dimensional dense vectors, each dimension of which contains information about the original content. By converting images into vectors, computers can easily understand the similarity between images.
Foteini also discussed the newest version of the Azure Computer Vision service, powered by the Project Florence, which is a state-of-the-art computer vision model developed by Microsoft Research. This model supports both image and natural language tasks and can be used to perform several computer vision tasks such as object detection, classification, background removal, video summarization, and frame rotator. It can also be used for image retrieval, which combines the image and natural language capabilities of the model.
Foteini demon2strated how to use the Vision Studio, the UI interface of the computer vision service, to perform image retrieval. She showed how to use text queries to search an image collection and how to adjust the threshold to show more or fewer images. She also explained how to use a reference image to search for similar images in an image collection.
Foteini also discussed the various databases available in Azure for storing vector embeddings, including Azure Cosmos DB for Postgres SQL, Azure Data Explorer, Azure Redis Database, and Azure Cognitive Search. She demonstrated how to use the vectorized image API to convert images into vectors and store them in the Azure Cosmos DB for Postgres SQL database. She also showed how to use SQL queries to perform vector similarity search.
Overall, the conversation provided a detailed and informative overview of vector similarities search and image retrieval with Azure AI Vision.
MVP TechBytes presents an in-depth guide to Git Branching and Merging Strategies using Azure DevOps. 💥
This session offers a comprehensive breakdown of GitFlow, Git Release branches, and various merge approaches. Gain insights into selecting the most suitable strategy through a live demonstration using Azure DevOps.
In this videos, I interviewed Mohammed Radwan, a principal DevOps consultant and a 12-year MVP for Azure DevOps and GitHub.
During the interview, Radwan provided an overview of Git, a distributed version control system that is hosted by Azure DevOps and GitHub. Git is the dominant and modern version control tool, allowing developers to collaborate, track changes, and manage releases efficiently.
Radwan also discussed the factors to consider when choosing a branch and merge strategy. The branch and merge strategy depends on the cadence, testing, and release strategies of the teams, as well as the practices and capabilities of the developers. There is no one best strategy, but rather the most suitable one for the context and goals.
One of the branch and merge strategies that Radwan explained and demonstrated is Git Flow. Git Flow is a branch and merge strategy that uses two long-lived branches (main and development) and three short-lived branches (feature, release, and hotfix). The video shows how to create, merge, and delete these branches using Azure DevOps and Git Bash.
There are other branch and merge strategies, such as trunk based development, feature based development, release flow, and GitHub flow. Each has its own advantages and disadvantages, and requires different levels of maturity and organization from the teams. Radwan recommends looking at all the factors and choosing the most appropriate one.
In conclusion, Radwan provided valuable insights into Git and branch and merge strategies, helping developers to make informed decisions and work more efficiently.
This is my first newsletter on LinkedIn and I wanted to keep this newsletter short and sweet. Thus I only wanted to share 5 Highlights from Microsoft Azure, that I find interesting and insgihtful. Five Highlights Thursday – 14th April 2023 Edition
1. TeknoSA Customer Story
Learn how a retailer in Turkiye – Teknosa detects attacks 18 times faster by using Microsoft Security Solutions.
Want to learn about how to empower defenders at the speed of AI, then you have to read and watch this post on Microsoft Security Copilot.
4. Connected Learning Experience
Want to boost your data and AI skills, why not try Microsoft Azure CLX.
5. Microsoft Build May 23-25 2023
The session catalog is ready for Microsoft Build, there is still time to register for Microsoft Build. It will be a hybrid event.
You can complement this edition of 5 Highlights Thursday with our MEA Developer Channel on YouTube where we have weekly interviews and learning material on Microsoft Azure, and much more.
And, as always, please give me feedback on LinkedIn. Which bullet above is your favorite? What do you want more or less of? Other suggestions? Please let me know.
Last by not least, know someone who might be interested in this newsletter? Share it with them.
Moving on from learning Iaas, PaaS and SaaS, in this article, we’ll explore what Azure Resources are, how they work, and how you can use them to build better applications.
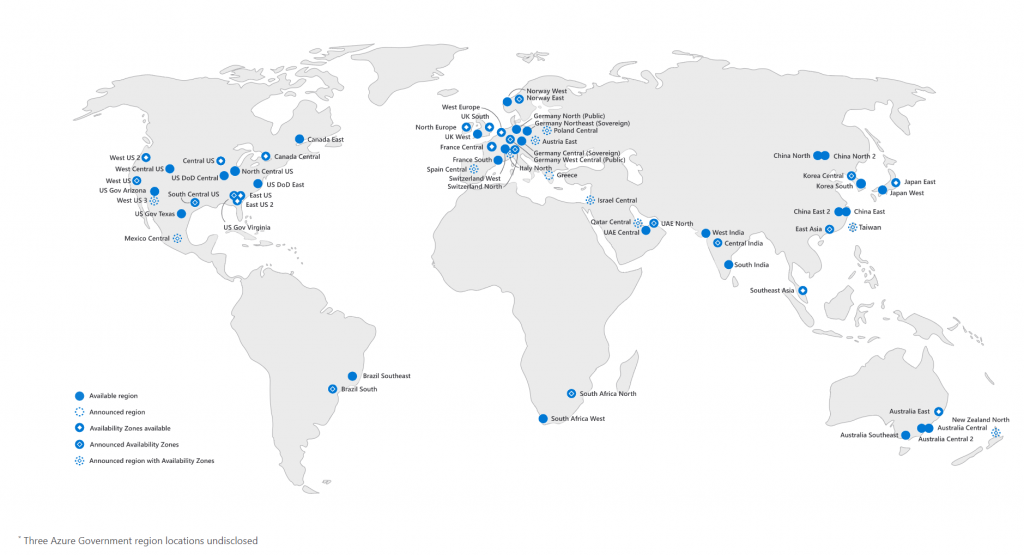
What are Azure Regions
Let’s start with Regions, and what they are in Azure. Azure regions are geographic locations where Azure datacenters are located. Example: UAE Region, India Region, West US region etc etc.
azure_regions
Each region is made up of one or more datacenters that are in close proximity and connected with a low-latency network. Azure regions are grouped into geographies, which are areas of the world that contain two or more regions that are in close proximity and connected by a low-latency network. Azure Regions also consist of something special to Azure called Region pairs. Region pairs are two regions within the same geography that are paired together to provide disaster recovery protection for services that are deployed in those regions.
Think of this way there are usually 2 datacenter 300 miles apart, you as a customer only see’s Canada Central. Techincally there are 2 regions/data center there. When Azure updates any software, they first update on one data center and if everything works well then they update the second data center. The added benefit of this is that your data is automatically replicated to the other data center. Example: if you are running a Virtual Machine and Database they are auto backup to the other region and its free of charge, the customer does not see this. This is an added benefit of using Azure it defintely helps with resiliency of the Azure cloud, but you as a customer must also run your own backup stragedy. You will want to have full control of your backup stragedies e.g backup to the 2nd largest customers you have in another region.
I thought it was Availability Zone not Region Pair
Azure Availability zone should not be confused with Region Pair. Azure Availability Zones are unique physical locations within an Azure region. Each zone is made up of one or more datacenters that are in close proximity and connected with a low-latency network. Availability Zones allow customers to run mission-critical applications with high availability and low-latency replication of data between zones. By using Availability Zones, customers can protect applications and data from datacenter-level failures.
azure availability zone
While Region Pairs are internal to Azure, Availability zones are for you to design your own system of where you want your data and compute to be. Example: You may want to have your web server run in 2 different AZ (Availablity zone) just in case if something happens you still have one web server running while the other one is coming back online. But before we go future we need to define Azure Resources also.
What Are Azure Resources?
Azure Resources
Azure resources are pre-built software components that you can use to build Azure-based applications. These resources include virtual machines, storage accounts, databases, and more. With Azure resources, you don’t have to worry about building and deploying these components from scratch. Instead, you can simply use the resources that are already available in Azure to get started quickly and easily. If you think about resources they are basically at the lowest level of items you wish to create VM, Database etc etc.
Some resources are pay-as-you-go, meaning that you only pay for what you use. Others require an Azure subscription, which provides access to a larger range of resources and features.
How Can You Use Azure Resources to Build Better Applications?
In order to build better application, it is subjective to your own interpretation but here are some ways you can use Azure resources to improve your applications:
Use Azure App Service to deploy and manage web applications.
Use Azure Functions to create serverless applications that can scale automatically.
Use Azure Cosmos DB to store and manage data for your applications.
Use Azure DevOps to streamline your development process and automate deployment.
Use Azure AI services to add intelligence to your applications.
Use Azure Kubernetes Service to deploy and manage containerized applications.
Use Azure Monitor to monitor the performance and availability of your applications.
By using Azure resources, you can simplify the process of building and deploying applications and focus more on developing the features and functionality that matter most to your users. Whether you’re building a small app for a single user or a complex system for a large organization, Azure resources can help you achieve your goals. Whether you are a seasoned developer or just starting out, Azure resources are a valuable tool that can help you build better applications more quickly and efficiently. Azure resources are a key part of the Azure platform that can greatly simplify the process of building and deploying applications. By using these resources, you’ll be able to focus more on developing the features and functionality that matter most to your users and less on the underlying infrastructure. So if you’re looking to build better applications with more efficiency and flexibility, be sure to take advantage of the available Azure resources.
Conclusion
We learned about Regions, AZ and Resources, in our next section we will go a level up and learn about Resource Groups, Subscription and Resource Managers. You can also watch the youtube video to learn more about Resources.
Fundamentals are the building blocks of fun.Mikhail Baryshnikov
Continuing on towards our learning cloud computing and Microsoft Azure, lets go over what is IaaS, PaaS and SaaS in Microsoft Azure?.
Definitions
IaaS
IaaS (Infrastructure as a Service) : refers to the delivery of computing resources, such as servers, storage and networking, over the internet. This allows companies to rent, rather than own, the infrastructure that they need to run their applications and services. Examples of IaaS Cloud providers include Microsoft Azure, Amazon Web Services (AWS) and Google Cloud Platform, etc.
Restaurant Analogy
If we use a restaurant analogy then IaaS can be compared to a restaurant that rents out its kitchen space to different chefs. The chefs can come in, use the kitchen’s equipment (such as ovens, stoves, and utensils) to cook their own dishes, and serve them to their customers. The restaurant provides the infrastructure (kitchen space and equipment) and the chef provides the recipe and cooks the dishes.
IaaS Advantages:
Agility. Applications can be made accessible quickly, removed and decommisioned whenever needed.
No CapEx. There is no up-front costs.
Consumption-based model. Organizations pay only for what they use and operate under an Operational Expenditure (OpEx) model.
Flexibility. IaaS is the most flexible cloud service because you have control to configure and manage the hardware running your application.
Management. The shared responsibility model applies; the user manages and maintains the services they have provisioned, and the cloud provider manages and maintains the cloud infrastructure.
Skills. No deep technical skills are required to deploy, use, and gain the benefits of a public cloud. Organizations can use the skills and expertise of the cloud provider to ensure workloads are secure, safe, and highly available.
Cloud benefits. Organizations can use the skills and expertise of the cloud provider to ensure workloads are made secure and highly available.
PaaS
PaaS (Platform as a Service): builds on top of IaaS by providing a platform for developers to create and run their applications, without having to manage the underlying infrastructure. PaaS providers typically offer a range of tools and services for building, testing, deploying and scaling applications. Examples in Microsoft Azure includes, Azure Active Directory, Azure SQL Server, Azure HDInsight, etc. Other similar platform of PaaS includes Heroku, Salesforce Lightning Platform and Google App Engine.
Restaurant Analogy
Again with a restaurant analogy PaaS (Platform as a Service) can be compared to a restaurant that not only rents out its kitchen space, but also provides the chefs with a pre-made menu and a team of sous chefs to assist them. The chefs can still create and serve their own dishes, but they don’t have to worry about managing the kitchen or creating the menu. The restaurant provides the platform (kitchen space, equipment, menu, and assistance) and the chef provides the recipe and cooks the dishes.
PaaS Advantages:
Agility. PaaS is more agile than IaaS, and users don’t need to configure servers for running applications.
No CapEx. Users have no up-front costs.
Consumption-based model. Users pay only for what they use, and operate under an OpEx model.
Skills. No deep technical skills are required to deploy, use, and gain the benefits of PaaS. Most servies are easily configurable through the internet/web interface or SDK.
Cloud benefits. Users can take advantage of the skills and expertise of the cloud provider to ensure that their workloads are made secure and highly available. In addition, users can gain access to more cutting-edge development tools. They can then apply these tools across an application’s lifecycle.
Productivity. Users can focus on application development only, because the cloud provider handles all platform management. Working with distributed teams as services is easier because the platform is accessed over the internet. You can make the platform available globally more easily.
PaaS Disadvantage
Platform limitations. There can be some limitations to a cloud platform that might affect how an application runs. When you’re evaluating which PaaS platform is best suited for a workload, be sure to consider any limitations in this area. Example: Certain modules/plugins for the services may not be provided out of the box. Plus customers usually cannot load/plug their custom modules or plugins into the service. E.g a database plugin that you may rely on is not supported in the PaaS service.
SaaS
SaaS (Software as a Service) is the most common and widely used cloud computing service model. It refers to the delivery of software applications over the internet, typically on a subscription basis. SaaS applications are typically accessed through a web browser, and the provider is responsible for managing the infrastructure and ensuring that the software is always up-to-date. Examples of SaaS include Microsoft Office 365, Salesforce, and Zoom.
Restaurant Analogy
Continue with a restaurant analogy SaaS (Software as a Service) can be compared to a restaurant that not only rents out its kitchen space, provides the chefs with a pre-made menu and assistance but also provides the dishes to the customers. The customers can come in and order from a set menu, and the restaurant takes care of everything from cooking the dishes to serving them. The restaurant provides the software (dishes) and the customer just orders and consumes them.
SaaS Advantages:
Agility. Users can provide staff with access to the latest software quickly and easily.
No CapEx. Users have no up-front costs.
Pay-as-you-go pricing model. Users pay for the software they use on a subscription model, typically monthly or yearly, regardless of how much they use the software.
Skills. No deep technical skills are required to deploy, use, and gain the benefits of SaaS.
Flexibility. Users can access the same application data from anywhere.
SaaS Disadvantage
Software limitations. There can be some limitations to a software application that might affect how users work. Because you’re using as-is software, you don’t have direct control of features. When you’re evaluating which SaaS platform is best suited for a workload, be sure to consider any business needs and software limitations.
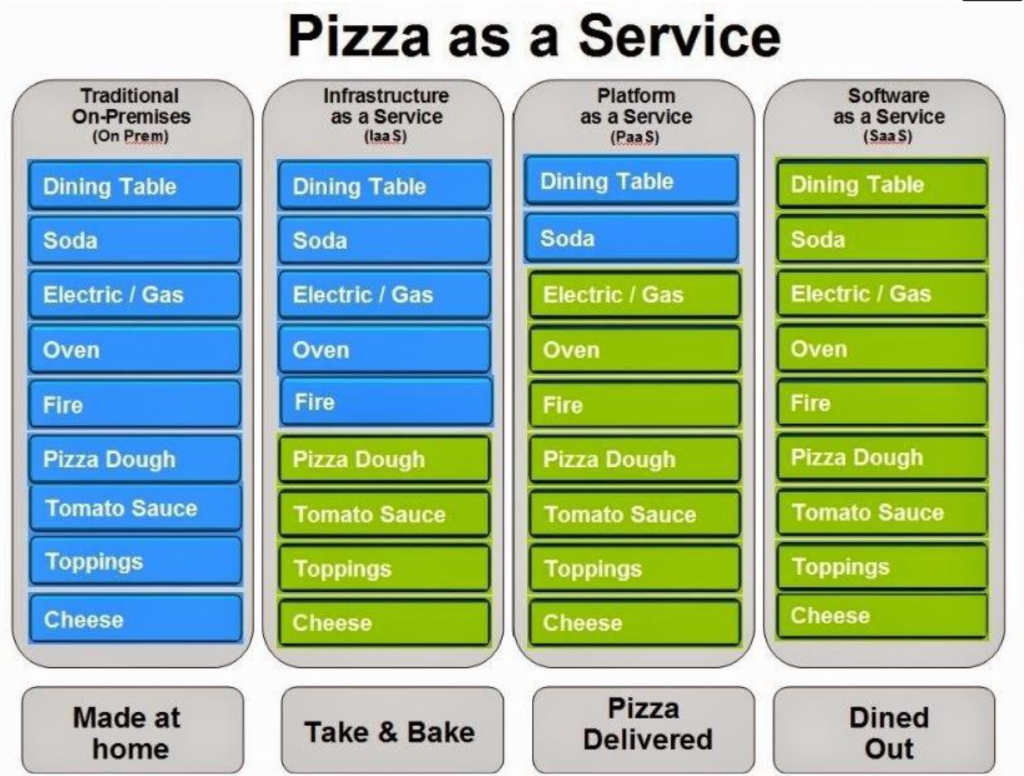
Additionaly if we look a diagram of a pizza restaurant it would look something like below:
pizza-as-a-service
Conclusion
In this section we learned about IaaS, PaaS and SaaS and what they stand for in Microsoft Azure. In the upcoming sections we will go deeper into Azure subscriptions, managemnt groups, resources and region. Stay tuned.
Additional Resources
Here is a list of resources that may be helpful as you continue to explore Microsoft Azure.
Cloud computing is the delivery of computing services using a pay-as-you-go pricing model.Which of the following statements are true of the pay-as-you-go pricing model?
Select all options that apply.
A. You can immediately stop paying for resources that are no longer needed.
B. You rent compute power and storage from someone else’s datacenter.
C. You must pay a fixed fee in advance for all Cloud services.
D. You rent physical hardware such as compute power and storage and maintain them within your own datacenter.
Question 2
Cloud Computing provides several benefits over a physical environment. Which of the following are benefits of cloud computing?
Select all options that apply.
A. Full control
B. Agility
C. Elasticity
D. High availability
Question 3
Which of the following options is not defined as a type of cloud deployment model?
A. Distributed cloud
B. Public cloud
C. Hybrid cloud
D. Private cloud
Question 4
Cloud computing provides computing services over the internet using a pay-as-you-go pricing model. With this model you typically only pay for the cloud services you use. Which of the following are benefits of the pay-as-you-go pricing model?
Select all that apply.
A. Lower operating costs.
B. You can run your infrastructure more efficiently.
C. You can scale as your business needs to change.
Question 5
True or False?
The Azure Portal updates continuously and requires no downtime for maintenance activities.
Our industry does not respect tradition – it only respects innovation Satya Nadella
I wanted to start writing about Cloud Computing and I thought it would be best to start with Microsoft Azure which I have been using for many years now. The series can be used by Digital Native or Startup on how to use Cloud Computing, we will go through Microsoft Azure and what it offers to us as a Startup or Digital Native company. But to start with lets ask ourselves a silly question? What is Cloud Computing?
Digital Native Definition
If you are wondering what is Digital Native, its basically a company that got started/born in the cloud, there was no on-prem for it. Think for example Uber, Allbrids, AirBnB, etc
What is Cloud Computing?
Cloud computing is a model for delivering computing services—including servers, storage, databases, networking, software, analytics, and intelligence—over the Internet (the cloud). It allows users to access these services remotely, rather than having to maintain their own infrastructure or purchase and install software on their own computers.
With cloud computing, you can access and use shared computing resources such as servers, storage, and applications through the Internet. The resources are owned and maintained by a cloud provider (some examples Microsoft Azure, Amazon AWS, Google Cloud, etc), which makes them available to you on demand, and you only pay for what you use. Think of it like electricity if you leave your light on, the electric company will charge you, but if you turn it off there is no charge for it.
There are several benefits Cloud computing provides, including:
Cost savings: Users only pay for the resources they use, and can scale up or down as needed, rather than having to invest in and maintain expensive infrastructure.
Flexibility: Cloud computing allows users to access a wide range of services and easily scale up or down as their needs change, rather than being limited by the capabilities of their own infrastructure.
Collaboration: Cloud computing makes it easy for users to collaborate on projects, as they can access the same tools and resources from anywhere with an Internet connection.
Reliability: Cloud providers generally have robust infrastructure and offer service level agreements (SLAs) to ensure uptime.
Security: Cloud providers often have advanced security measures in place to protect users’ data, such as firewalls, intrusion detection systems, and encryption.
What types of cloud computing are there?
There are four main types of cloud computing: public, private, multicloud and hybrid.
Public cloud – This type of cloud is owned and operated by a third-party cloud provider, which makes the resources available to the public over the Internet. Customers pay for what they use no CapEx cost only OpEx, and the provider is responsible for managing the infrastructure and ensuring that it is always available and performing optimally.
Private cloud – This type of cloud is owned and operated by a single organization, and the resources are not shared with any other organizations. A private cloud can be physically located on-premises or off-premises, and it can be managed by the organization itself or by a third-party provider.
Hybrid cloud – This type of cloud combines elements of both public and private clouds, allowing an organization to use the resources that are most suitable for each workload. For example, an organization might use a public cloud for development and testing, and a private cloud for production workloads that require a higher level of security and compliance.
Multi cloud – This type of cloud combines elements of multiple cloud providers, allowing an organization to use the resources that may expand mutliple cloud providers or even running different workload on different providers. For example, a company may have its SAS offering that a customr can choose which cloud provider they wish to use. An example would be ElasticSearch as a service, where one can choose which cloud provider you wish to launch their solution. Another example could be an organization may run majority of their service in one provider but also have a pilot light or warm standby environment ready to lauch in another cloud provider for fail safe issues. Yet another one can be an organization running their main database in one provider but their other workloads in another cloud provider, could be due to data residency or just pricing. The variations of things all depends on the business need.
Pilot Light Definition
The term pilot light is often used to describe a Disaster Recovery scenario in which a minimal version of an environment is always running in the cloud.
Pros and Cons
Each type of cloud has its own benefits and trade-offs, and organizations can choose the type that best fits their needs. How do we know which one to choose, below you can see the benefits and trade-offs of the three types of cloud computing as follows:
Public cloud:
Benefits: Low cost, no upfront investment, pay-as-you-go pricing, scalability, and reliability
Trade-offs: Reduced control and security, potential compliance issues
Private cloud:
Benefits: Greater control and security, tailored infrastructure, potential cost savings for large organizations
Trade-offs: Higher upfront investment, more complex to set up and manage, may require specialized skills and resources
Hybrid cloud:
Benefits: Flexibility, ability to use the best resources for each workload, potential cost savings
Trade-offs: More complex to set up and manage, may require specialized skills and resources, potential security and compliance issues
Multi cloud:
Benefits: You are not locked into just one vendor, if any issue happens at on vendor downtime your system can still be up since another vendor would mostly likley not be affected.
Trade-offs: The most complex of all, and not to mention the pricing it will be the most expensive due to the fact most of the time you will not be able to take advantage of the services most cloud provider provides, e.g Functions as a service, etc. You will also need to have IT people who are well versed in multiple cloud providers and those people are hard to come by.
I also wanted to mention that there are three main types of cloud computing: infrastructure as a service (IaaS), platform as a service (PaaS), and software as a service (SaaS). We will go over this more in details later but let's first go over a fundamental thing about cloud computing called Shared Responsbility Model.
What is Shared Responsbility Model?
In cloud computing, the concept of shared responsibility refers to the way that responsibilities are divided between the cloud provider and the customer for the operation and maintenance of the cloud environment.
The cloud provider is responsible for the infrastructure and hardware, as well as for the availability, performance, and security of the underlying cloud services. The customer, on the other hand, is responsible for managing and securing their applications, data, and operating system, as well as for complying with any relevant laws and regulations.
This model of shared responsibility is designed to allow customers to take advantage of the benefits of cloud computing while still maintaining control over their own applications and data. It is important for customers to understand their responsibilities and to ensure that they are properly fulfilling them in order to effectively use and secure their cloud environment.
The specifics of the shared responsibility model can vary depending on the type of cloud service being used and the specific terms of the service agreement. It is important for customers to carefully review the service agreement and to understand the specific responsibilities that are being shared in their particular cloud environment.
Additional resources on Microsoft Shared Responsbility are below:
What we learned today was what really defines cloud computing, what are the types of cloud computing, their pros and cons and also shared responsbilit. I will go more into details of IaaS, PaaS and SaaS the models that Cloud Computing offers.
Excercise
Question 1
Which cloud approach is used by organizations to take full advantage of on-premises technology investments and allows data and applications to be shared between two environments?
A. Public cloud
B. Private cloud
C. Hybrid cloud
D. On-premises datacenter
Question 2
Your company has hundreds of servers hosted in their on-premises environment. The company plan to migrate some of the servers to an Azure pay-as-you-go-subscription. Which of the given expenditure model would you suggest in this case?
A. Public cloud
B. Azure Reservations
C. Operating expenditure
D. Capital expenditure
Question 3
You have an on-premises network that contains 100 servers. You need to recommend a solution that provides additional resources to your users. The solution must minimize capital and operational expenditure costs.
What should you include in the recommendation?
A. a complete migration to the public cloud
B. an additional data center
C. a private cloud
D. a hybrid cloud
Question 4
You plan to migrate several servers from an on-premises network to Azure. What is an advantage of using a public cloud service for the servers over an on-premises network?
A. The public cloud is owned by the public, NOT a private corporation
B. The public cloud is a crowd-sourcing solution that provides corporations with the ability to enhance the cloud
C. All public cloud resources can be freely accessed by every member of the public
D. The public cloud is a shared entity whereby multiple corporations each use a portion of the resources in the cloud
Question 5
In which type of cloud model are all the hardware resources owned by a third-party and shared between multiple tenants?
I wanted to talk about basic types in Rust. Lets begin with Numerical Types in Rust, since Rust is a statically typed language, which means that it must know the types of all variables at compile time. I will talk about number types that are built into the language.
Numerical Types
Numerical values are divided into Integer Types and Floating-point type. A simple numerical type can be signed integer types or unsigned integer types.
Signed integer types start with i instead of u
Integer Data types are listed below:
i8 : The 8-bit signed integer type.
i16 : The 16-bit signed integer type.
i32 : The 32-bit signed integer type.
i64 : The 64-bit signed integer type.
u8 : The 8-bit unsigned integer type.
u16 : The 16-bit unsigned integer type.
u32 : The 32-bit unsigned integer type.
u64 : The 64-bit unsigned integer type.
isize : The pointer-sized signed integer type.
usize : The pointer-sized unsigned integer type.
Type
MAX
MIN
i8
127
-128
i16
32767
-32768
i32
2147483647
-2147483648
i64
9223372036854775807
-9223372036854775808
i128
170141183460469231731687303715884105727
-170141183460469231731687303715884105728
u8
0
255
u16
0
65535
u32
0
4294967295
u64
0
18446744073709551615
u128
0
340282366920938463463374607431768211455
Rust
1
2
3
leta=100;// The default integer type in Rust is i32
letb:i8=-128;//explicitly telling it will be an i8 type
letx=2i8;// Equals to `let x: i8 = 2;` personally I don't like this way of, I prefer the previous statement rather
Floating Point data types are simplier, there is only 2 types.
f32 : The 32-bit floating point type.
64 : The 64-bit floating point type.
Rust
1
2
letx=1.5;// The default float type in Rust is f64
lety:f32=2.0;// setting default to f32
Summary
This was a short intro to the numerical values and the limits of each value in Rust.