Taswar Bhatti
The synonyms of software simplicity
WordpresstoGatsby

As we have got to know that Gatsby has built in GraphQL, we will learn this time how to ask Gatsby to request data from GraphQL. We will ask for the data that we wish to populate into our blog. For simplicity sake we will only target on the title and tagline. Eventually we will dive deep into into it later when we talk about plugins.

First we need to modify our gatsby-config.js file and add sitemap information into it. Below you will see that I have added a tag called SiteMetadata and inside the json object it contains title and tagline.

If we wish to view this data we can go to our trusty graphql site that Gatsby has created for us (http://localhost:8000/___graphql). We can query the data in the query field like below and we will get back a json object with the information.

gatsby-graphq-query

gatsby-graphq-query

How to get the data into our page

You are like great we have graphql but how do I get this data into my page? That is where graphql query inside our code comes in handy. Let open up our index.js that we have been working on and modify it to include graphql and we can also query it like the code below.

NOTE: Query only works in pages

NOTE: The single right tick quotes that encapsulates the query

We have also passed in {data} as a parameter into the Home function, we are able to print the data with the {} brackets. e.g {data.site.siteMetadata.title}, it is basically the same way we see the data in graphql UI.

How to share the data to components then?

One way to share data to component is to pass it down but then it becomes ugly quite soon, therefore there is actually another way to query data with components that is to use staticQuery, since page query are not supported in components. Let’s see that in action for our Layout component we made. Open the file components/layout.js

As you have noticed I have imported useStaticQuery and graphql into my javascript. I have also declared a const variable called data and have used it to pass the data to my header component and footer component. Again you can use the same query inside of component the only difference is that you can see above is I have wrapped it around useStaticQuery.

Summary

We talked about using Query to get data from GraphQL for our Gatsby site, where Query are only allowed in pages. We also talked about how we can use staticQuery to get data inside our components. In our next section we will talk about using source plugin with GraphQL power to get data from local filesystems, such that we can eventually read our blog post.

WordpresstoGatsby

We have our footer and header together and it’s time to talk about Layout. We can create a layout component in Gatsby such that our header and footer can be embedded/nested into any page you wish to have later on. Example our about, contact pages. This will allow us to clean up some of our page code.

Creating a layout in Gatsby with VSCode

We will create a component called component/layout.js inside the component folder. The code for layout is as below.

Couple of things you may notice, we are taking something called children into the parameter of the Layout component. This is a way for us to embed/nest more html components inside the layout. If we look at our example pages/index.js page we will see everything that is declared inside out page will be translated into children for the layout page. Thus having a header and footer page for them also. We have embedded content and sidebar div into the layout, which will result in Header and Footer to wrap them around, with the code below.

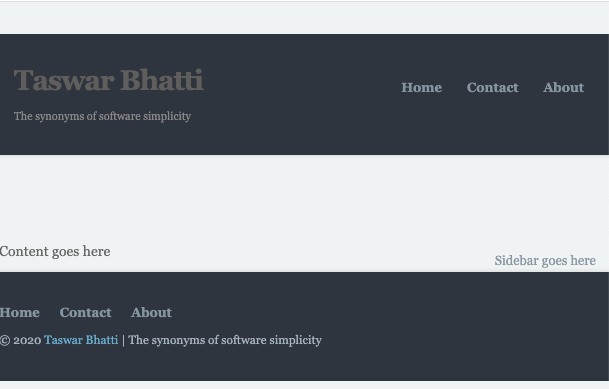
Now our page will look like the image below.

Header Footer with sidebar and content page

There are still couple of things to fix but we are getting there, and you may have notice that the data is being repeated in our layout. I think we can do better and Gatsby does allow us to do better with StaticQuery which we will cover next.

Summary

We talked about using layout component for our content so that we can use nested components for other pages. We have used the children parameter to pass in nested html components into our layout component so that we can embed other content into our page.

WordpresstoGatsby

Now that we have the header of the page, let’s try to focus on our footer. We will be creating a footer component in Gatsby with VSCode, we will skip the content and sidebar for the time being and get back to it later. Just like the header page we will create a new file called component > footer.js inside our component folder. We will again use css modules for our style called component > footer.module.css. Below is the code for the component > footer.js, as you can see it has clean html and I have removed a lot of redundant styles from wordpress.

Something you may note above is I am just using plain vanilla Javascript for the year where I have used {(new Date().getFullYear())} to get the current year. One can embed Javascript objects with JSX also.

Below you will find my footer.module.css also included, I have changed some of the styles, they were using id in my wordpress blog and I have changed them to use class.

Now let’s try to edit our index.js file and include the footer in there also, when we try to just add the footer below Header tag we will see an error. Adjacent JSX elements must be wrapped in an enclosing tag.

In order to mitigate the error we need to add empty tag <> and < / > which makes it pretty ugly, I think a better design will be to use a layout, so in the next section we will talk about how to use Layout and add our content and sidebar. See I told you we will get back to content and sidebar, just a bit later 🙂

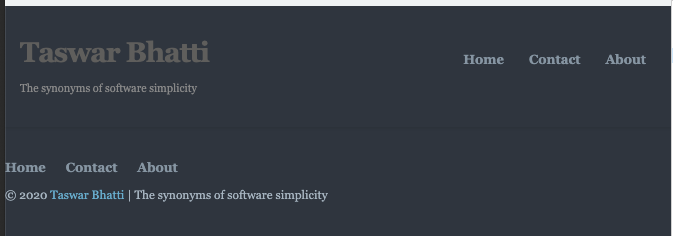
Below you will find the fixed index.js file and also the screen shot of what we have so far, still far from done but at least we are getting there.

header-footer-gatsby

header-footer-gatsby

Summary

We created our footer style by using the css module, our styling still requires some more work padding etc but we are slowly progressing and getting there. We will tackle the layout in our next section to make thing clean such that we can use the layout for about, contact etc pages and not repeat the tags everywhere.

WordpresstoGatsby

When it comes to styling in Gatsby, it allows one to style with css, less, scss, etc. I wanted to keep things simple for the time being and will use css and just copy what I have for the header in my blog to see how it will look like in Gatsby. It will be a way to find out the amount of work it will require for me to just create the header layout of my blog.

Getting started

Let’s choose a clean template of Gatsby without any pages etc. Gatsby provides us with the hello-world template which is the minimal template. We will start the template by executing the command below.

Gatsby provides us with a way to create global styling by adding the style reference file into gatsby-broswer.js. Lets create a global.css file and add the html and body css styles. We will create a folder in src/styles and also create a file called global.css inside of it.

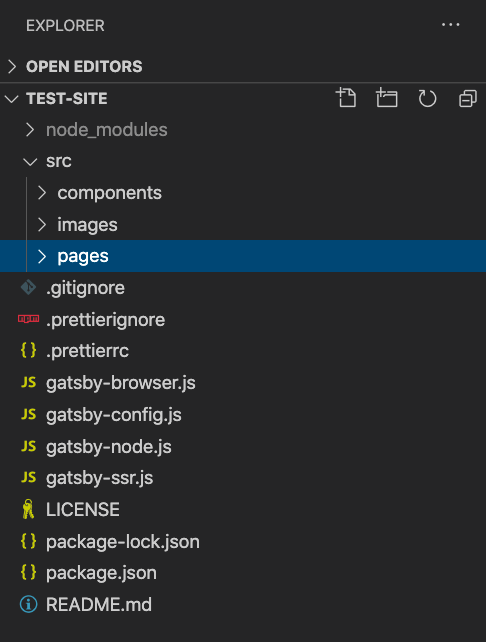
Your folder will look like below in vscode.
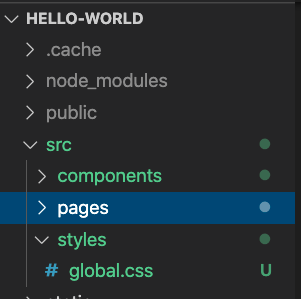
gatsby-styles-global

gatsby-styles-global

Below is the content of global.css, I copied the html and body styles into this file from my blog.

Now we will need to add gatsby-browser.js file so that it can apply this style globally to our site. The file resides on the root folder where you will also find gatsby-config.js

We also need to edit the file to tell it where our global.css file is residing.

Now we will have the global style that we have applied to our site.

Gatsby component module styling

Gatsby allows us to use css modules out of the box. We will be using css modules for our header, we will create a header.js file inside of the src/components folder.

I will now copy and paste my header source into the header.js file. Below I have replaced with Link and I am also passing in a prop into my function, so that I can use the data that will be passed in. I have also replaced the css class to use className rather.

As you can see there are a lot of css elements here and wordpress generates a lot of stuff by default. Not necessary clean html I guess.

Now let’s create our style for our header.js file, we will create a file called header.module.css inside the components folder.

Now we need to modify our header.js file to use these css styles. By default I am using kebab-case for my css, and in our javacript code I can refer to the style by camel casing e.g main-nav becomes mainNav.

Below you will see the clean version of the header.js file where I imported the style and used it in the component.

You may see something funky above where I use join for two styles. In React you need to use an array and join it with two styles in order for it to have two styles in one component. One of the nice thing about using modules is that all the css styles will be unique to the site, so no conflict at all. e.g headerStyles.logoDefault will be converted by Gatsby to header-module–logo-default–1YbkP.

Launching the site

Finally we need to modify our src/pages/index.js and use our Header file inside of it. We will also pass in 2 properties into Header, the title and tagline of our blog.

Finally lets launch the develop server and view how it looks like.

headerpage-from-gatsby

headerpage-from-gatsby

Summary

We covered styling using global styles and also how to use components modules css to style a component. How Gatsby will auto generate css unique code so that there are no conflicts between other components and styles. I hope you see that by default your code will be quite clean by gatsby. Next up we will try to cover more the body and footer for the blog.

WordpresstoGatsby

As mentioned earlier I wanted to move my blog from WordPress to Gatsby. Let’s get started and get our feet wet with Gatsby using VSCode and see how it all comes together. I will be using VSCode for all my development for this migration.

Install Gatsby

In order to get started we need to satisfy gatsby requirement, that is to instal nodejs and npm. For mac you can use brew to install nodejs/npm and chocolatey for windows.

Once you have installed npm you can execute the command below to install gatsby cli, I am installing it globally using the -g command.

You can also install GatsbyHub vscode extension, I will use mostly the command line since I am comfortable with the command line. GatsbyHub does make it easy for people who like to just be in the IDE, it is optional.

Getting started with Gatsby

We will use the gatsby cli command line to create a new site, let’s create a new site called test-site with the cli. What the command line below will do is use the gatsby starter default template to create the site for us. You can provide other templates of your choice when creating the site. I will cover template later on.

Let’s view the code in vscode and see what has been generated. Change directory into the test-site and execute $code . (this will open vscode to the current directory).

VSCode Gatsby folder

Gatsby VSCode default folder structure

In Vscode use the terminal and change to the current directory test-site if not in that directory and execute the gatsby develop to run the gatsby web server. This will allows you to use your local traffic to view the generated site, by default gatsby will use port 8000 and you will be able to view your site. In addition to your web site there is also another url for graphql that is being used by Gatsby. I will cover graphql later on.

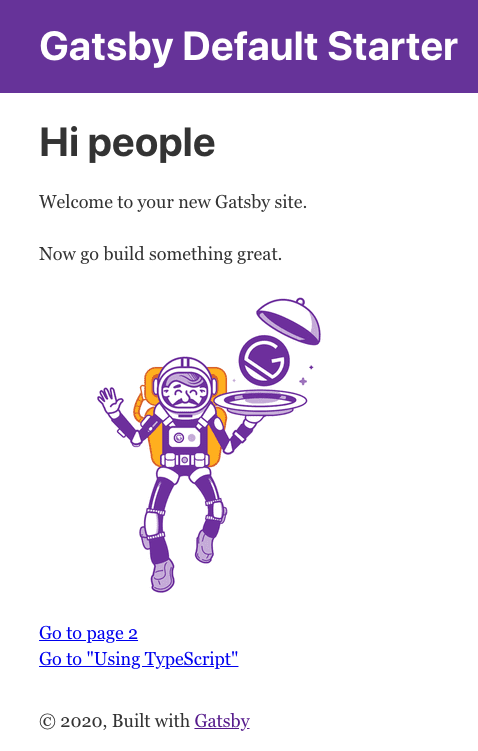
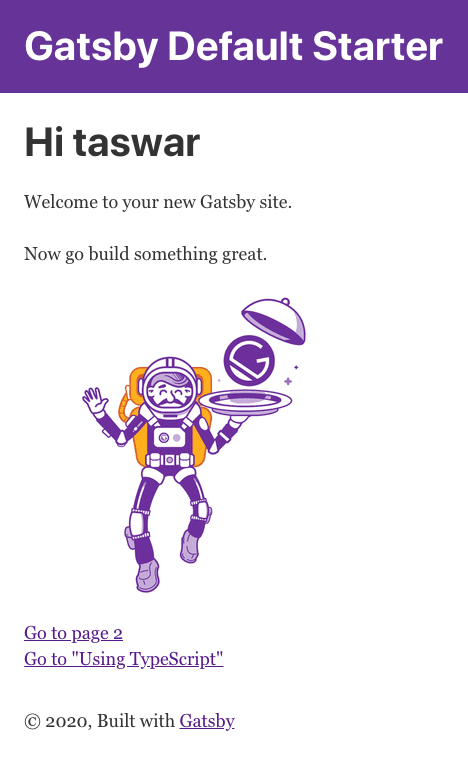
When we open our browser to http://localhost:8000/ we will see the starter page like below.

gatsby-default-starter

Gatsby default starter

We can also view the graphql UI on the http://localhost:8000/___graphql it would look something like the image below.

gatsby-graphql

gatsby-graphql

You can use graphql to query for information about your site, just like the site that we have just created e.g we can query for the site title of our site using graphql. You can click on Site->SiteMetadata->title for it. It will then generate a query like below in graphql.

Editing Pages

Let’s switch back to VSCode and open the src folder and drill down to pages folder. You will find src/pages/index.js file in there. We will try to modify it and say Hi “yourname” in there. E.g I will say Hi taswar and save it. Once saved you don’t even need to reload your page, gatsby will see the change and auto reload it for you.

gatsby-changename

gatsby-changename

Adding new file

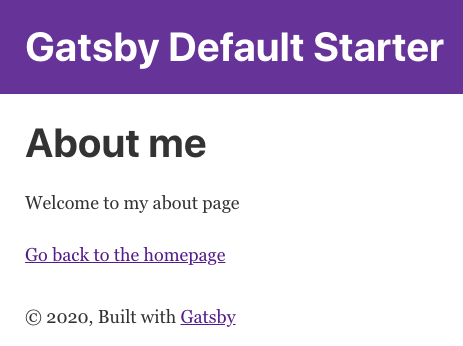
Now we will add another file to the pages folder, we will call it src/pages/about.js, place it into the same pages folder and add the code below to it.

Go back to your browser and try to visit http://localhost:8000/about. You will notice that all pages inside with js extension will automatically have the url based on the filename. E.g the 404.js file or page-2.js has the url as http://localhost:8000/page-2/. That’s pretty sweet right?

gatsby-about-page

gatsby-about-page

Looking at the code you may also have notice some special tag called Link, that is a way for gatsby to link to internal pages. For external pages you will continue to use the a href links. The advantage of the Link tag is it allows preloading of data, again built into Gatsby.

Summary

We went through a simple case of Gatsby where we installed it, created a site using default template and using the develop server that comes with gatsby. We also tried out some of the graphql that gatsby provides. I will cover more in details of Gatsby in the next blog post so stay tuned.

WordpresstoGatsby

I have been using WordPress for a very long time now, and have been happy with it. One down side of wordpress is you have lots of patches to apply, update plugins and running my own wordpress with all the security issues seem like such an old idea. Yes, of course you can choose to a hosting provider to host wordpress by others but being old fashioned I like to own my own things and tinker around things. Therefore I started to look at alternatives to see what the new CMS and javascript landscape has to offer. I remember when I was speaking at ForwardJS in Ottawa, Gatsby kind of caught my attention.

What is Gatsby?

From their website it states “Gatsby is a blazing fast modern site generator for React.” React cool right? So I thought why not try out React and see where we go from here. Thus this is the journey of moving my wordpress site to Gatsby. I wanted to go really step by step process rather than having someone tell you 3 quick ways to move or get rich scheme. I want this to be a journey in order for us to learn what it really takes to move a wordpress site to Gatsby.

What are the advantages of moving

One thing to note and to understand is that Gatsby is not really a CMS it’s a site generator, so it will be in React but generating html files with JavaScript/React on top. When once tries to serve these html file from a CDN then it will super fast. Example AWS S3 to serve the static website. Not to mention the price of serving static web content is way cheaper than running a webserver on linux with mysql database. Last but not least I can write blog post with Markdown rather than using the wordpress UI to login and write my post, I will be able to write even offline 🙂

What are the disadvantages?

Since it will be static website there are no comments, unless you use third party e.g Disqus and Facebook Comments using javascript to embed it. The downside is there will be ads, which sucks. You can run a simple nodejs site with postgres on Heroku or use git comments. I plan to use git comments and lets see how that goes.

Summary

In my next blog post I will get started on our journey and learn a bit more about Gatsbyjs and how we plan to migrate from wordpress and build in gatsby.

Redis

In this blog post I wanted to cover how to use Redis with AspNetCore WebAPI. Most of my examples have been covering using console application since I wanted to explain the core concepts of Redis and the functionality. Now lets see how you can use it in a Web Application.

Create the webapi

To start we will create webapi using command line dotnet new

Now that we have our skeleton created, we need to add some of the dependency for Redis. I have used dotnet command line again to add the dependencies. I am also using Message Pack for my serialization, there are other options also like Newtonsoft etc.

If you want to learn more about Message Pack https://msgpack.org/index.html

Running Redis in Docker

I am using Docker to run my Redis server, the command to execute to run my redis server as below

If you want to know more about docker and redis read my previous blog post http://taswar.zeytinsoft.com/redis-running-in-docker/

Now we will need our aspnetcore information on how to connect to redis, the best option is to use your appsettings.json file to have the information. For production you will probably like to store it in some external configuration management like Hashicorp Vault or Azure Vault.
Open up your appsettings.json file and add the Redis configuration information. One can add multiple Hosts in the array, for us we only have 1 server running on localhost.

Redis AspNetCore WebApi

Now we need to configure our webapi to start using redis, we will modify our Startup.cs file and use the build in IoC (Dependency Injection) container that it provides to hook things up in our ConfigureServices method.

Create a Controller

Lets add a new controller and call it RedisController, we will use the controller to call redis to store some values and to get some values out of redis. The sample below shows a HttpGet, HttpPost and a HttpDelete method decorated attribute. As you may also notice that the IRedisCacheClient was injected into the constructor by the IoC Container when we configured our services in Startup.cs

Testing the methods

I used curl to test out the method, first I used the POST method to create the data I wanted. I am using the -k prefix since I wanted to ignore the cert and I just posted some random json data into the method, even though in the method I don’t use it as above, but just to give an example of how you would pass in data.

Now I can call the get call to get the data, one can use curl or just use chrome to call the get call. The result are show below.

Calling StackExchange.Redis Api

What if we want to call Redis StackExchange calls directly? We can do so like below I am using the SetAdd method and SetMembers to get values out of Redis Sets

Summary

I hope this explain how to use redis with your aspnetcore application, you can get the source code for this project on github. https://github.com/taswar/RedisForNetDevelopers/tree/master/14.RedisAspDotNetCore. Also feel free to comment on it and ask questions, if there is something missing feel free to reach out.

aws-iam

This would be the last post on how to add AWS IAM users sign-in link for signin to console. If you wish to read the other post please check them out below.

How to add AWS IAM users sign-in link for signin to console

In your Dashboard click and on Customize
AWS-IAM-Customize-Sign-In-Link

AWS IAM Customize Sign In Link

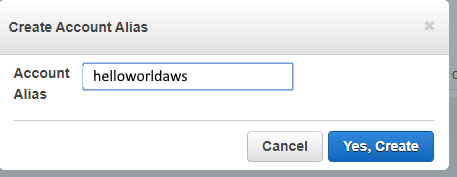
Enter the name you want to use for your sign-in and create the alias you wish to have
AWS-IAM-Account-Alias

Account Alias

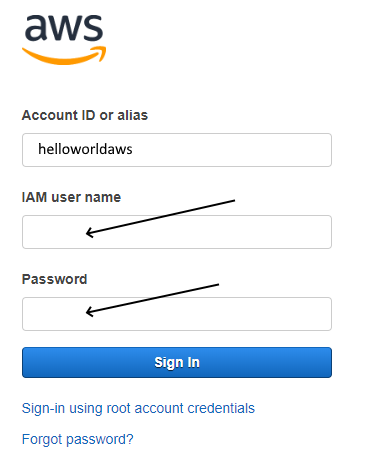
Now your users can visit the url you have create and sign in, I will use the user I create before, NOTE: now the Alias is already filled in.
AWS-IAM-Login

AWS-IAM-Login

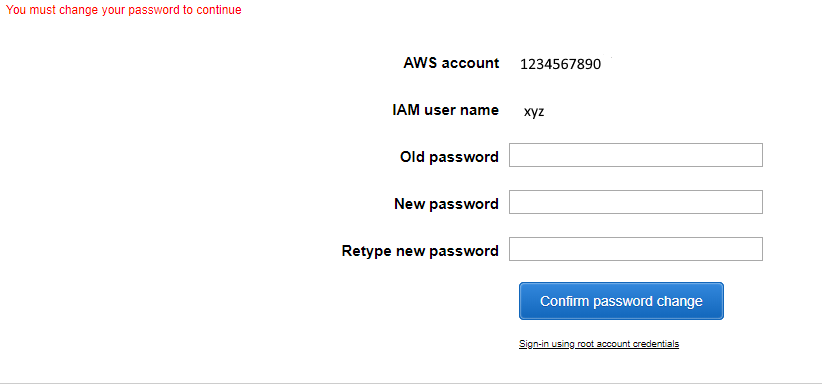
Once logged in using the csv file we saved earlier we will need to change the password
AWS-IAM-Change-Password

AWS IAM Change Password

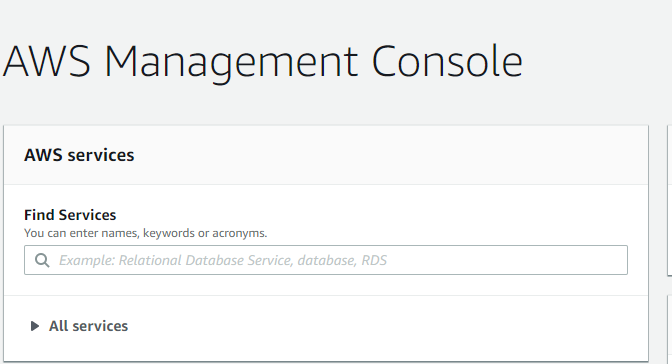
When we have satisfied our Password Policy we will then be redirected to the console
AWS-IAM-Logged-In-Console

AWS Console Logged In

Summary

This concludes our AWS IAM part of securing your AWS account there is a lot more that one can add to it. Probably in the future I will add more into it. If you like these AWS post let me know, I intend to add more of them.

aws-iam

This would be the second last section to cover the AWS IAM. We will cover Apply an IAM password policy in AWS. If you wish to read the previous section the links are provided below.

Apply an IAM password policy

We can now click on the dashboard for Apply an IAM password policy
AWS-IAM-Apply-IAM-Password-Policy

Apply IAM Password Policy

Click on the Set Password Policy
AWS-IAM-Set-Password-Policy

AWS IAM Set Password Policy

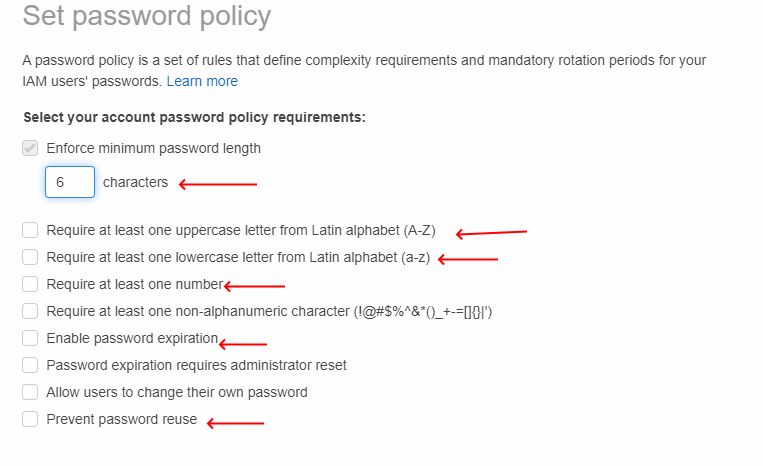
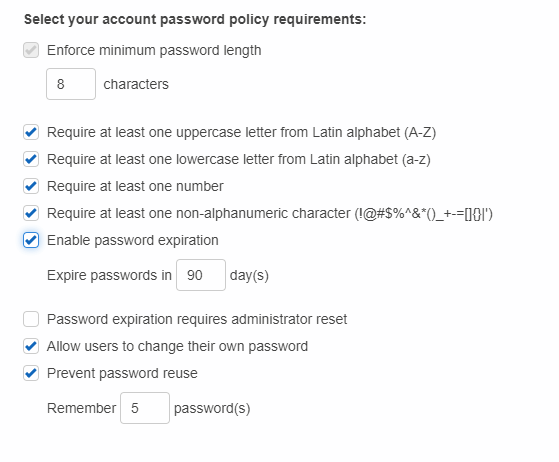
Now inside the section you can pick the options you wish to add, I have added a sample below.
AWS-IAM-Set-Password-Policy-Display

Set Password Policy Display

AWS-Set-Password-Policy-Sample

Password Policy Sample

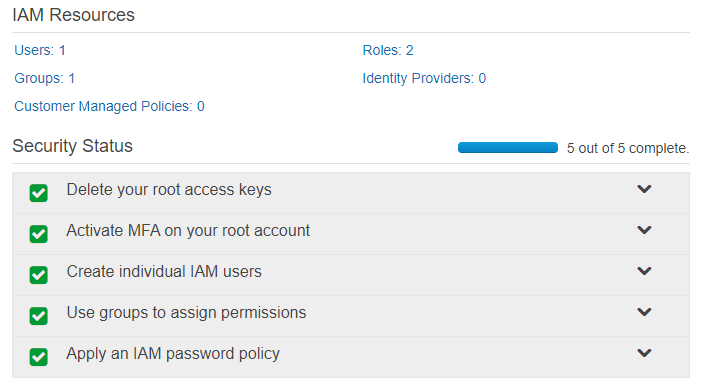
By completing this part now we have full green check marks in our IAM Resources in AWS
AWS-IAM-Resources

AWS-IAM-Resources

Summary

We have now completed our AWS IAM Resources and have completed and got full green check marks for them. Congratulations. I wanted to cover one more thing, check my next blog post and you will find out.

aws-iam

In this post we will cover using groups to assign permissions to users in AWS. This is the third part on IAM on AWS to protect your account. You can view previous part below.

Use groups to assign permissions in AWS

Lets now expand the section of Groups in our IAM Dashboard and click on Manage Group
AWS-IAM-Use-Groups-To-Assign-Permissions

Use Groups To Assign Permissions

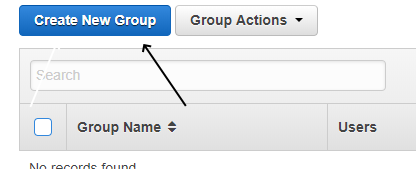
We can then click on Create New Group
AWS-IAM-Create-New-Group

Create New Group

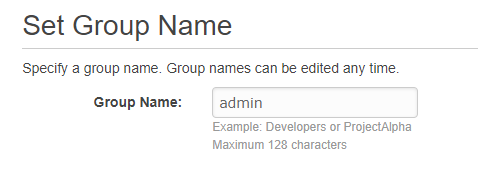
I will create a group named “admin”
AWS-IAM-Set-Group-Name

Set Group Name

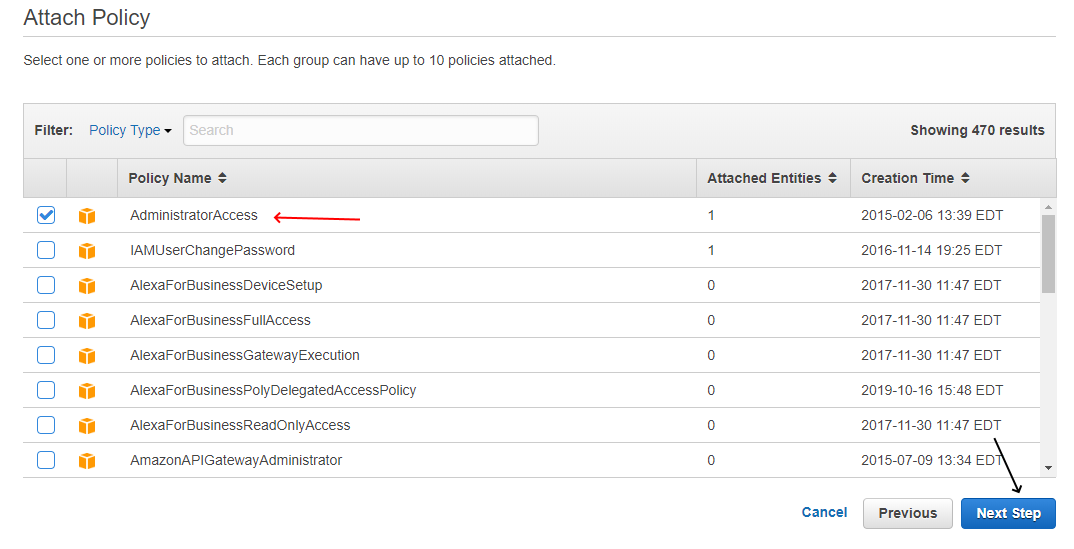
I will now attach the AdministratorAcccess Policy to the group I just created
AWS-IAM-Attach-Group-Policy

Attach Group Policy

You can now review the group and the attach policy and continue
AWS-IAM-Group-Review

IAM Group Review

We can now clean up some items and add the group to the user we previous created so that the user is in the admin group rather than having direct permission to AdminstratorAccess. Click on the newly create admin user
AWS-IAM-New-Group-Created-Select

New Group Created Select

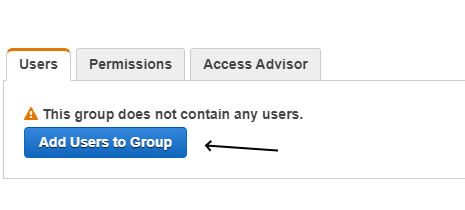
We can now click on Add Users to Group to add the previously created user
AWS-IAM-Add-Users-To-Group

Add Users To Group

Select the user/users you wish to add to the group.
AWS-IAM-Select-User-to-Group

Select User to Group

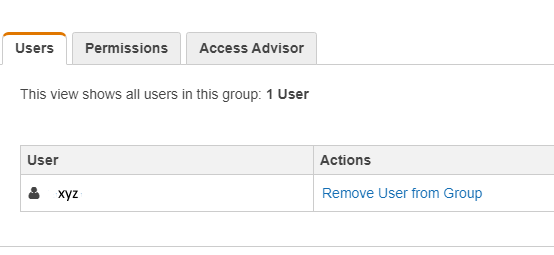
Afterwards we will find that the user in now added to the group
AWS-IAM-User-Added-To-Group

User Added To Group

We can now remove the user policy that the user has since the user is already in Admin Group we can revoke the policy of AdministratorAccess, there is no need to have 2 things that mean the same. Click on User and select the policy and click on the right to delete it.
AWS-IAM-Remove-User-From-Policy

Remove User From Policy

A prompt will show to confirm the detach of policy from the user, click on Detach and the policy will be removed.
AWS-IAM-Detach-Policy

Detach Policy

Summary

We have covered the forth step in our IAM in AWS on groups to assign permissions to users in AWS. Next we will cover how to Apply an IAM password policy.

UA-4524639-2