To continue on with our previous blog post, I will introduce Hashicorp Vault as a key management to manage our secrets for our Nodejs weather application.
Installing Vault
I will use docker to pull the docker image from dockerhub.
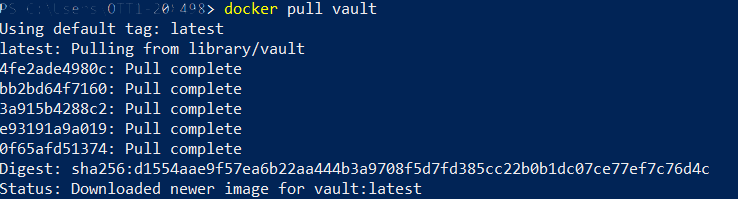
docker-install-vault
One can also download Vault for their OS at (https://www.vaultproject.io/downloads.html)
Now that I have vault image pulled, I will create a docker compose file for Vault to use mysql as a back-end store. I can also run Vault in dev mode but if I enable dev mode then Vault runs entirely in-memory and starts unsealed with a single unseal key. I wanted to show more of a real life scenario of starting Vault.
First thing I will create couple of directory and files that I will store some configuration into.
|
|
$mkdir myvault $cd myvault $mkdir config $mkdir policies $mkdir log $mkdir data |
Now that we have a directory we can create a docker-compose.yml file inside of the myvault directory. I assume you already have mysql image, if not you call pull the image from dockerhub.
1 2 3 4 5 6 7 8 9 10 11 12 13 14 15 16 17 18 19 20 21 22 23 24 25 26 27 28 29 30 31 32 33 34 35 36 37 38 39 40 41 |
version: '2.1' services: db: image: mysql:5.7 volumes: - "./data/db/mysql:/var/lib/mysql" restart: always container_name: vault_db ports: - "3306:3306" environment: MYSQL_ROOT_PASSWORD: vaultysalty MYSQL_DATABASE: vault MYSQL_USER: vault MYSQL_PASSWORD: vault healthcheck: test: ["CMD", "mysql" ,"-h", "127.0.0.1", "-P", "3306", "-u", "vault", "-pvault", "-e", "SELECT 1", "vault"] interval: 1s timeout: 3s retries: 30 vault: image: vault:latest container_name: vaultserver depends_on: db: condition: service_healthy links: - "db:db" hostname: "vault" restart: unless-stopped environment: VAULT_ADDR: http://127.0.0.1:8200 volumes: - ./config:/config - ./policies:/policies - ./log:/vault/log ports: - "8200:8200" entrypoint: vault server -config=/config/config.hcl |
Before we fire up vault, here is the content of the config.hcl file, located right in the config folder we just created. This will configure Vault with the storage options and listen on port 8200
|
|
disable_mlock = true storage "mysql" { address = "vault_db:3306" username = "vault" password = "vault" database = "vault" } listener "tcp" { address = "0.0.0.0:8200" tls_disable = 1 } |
Running Vault
Use the docker compose file and run the following command to bring up Vault
|
|
$docker-compose -f ./docker-compose.yml up |
If you mess up you can always run $docker-compose rm to remove the created containers.
Testing our installation
Now that we have Vault configured and running, we now need to initialize Vault. Vault uses Shamir Secret Sharing Technique for initializing the key to use for Vault. Which takes multiple keys and combines into one single master key.
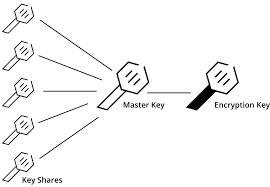
shamir-secret-sharing-vault-unseal
Unseal Vault
We will use the operator init method to call Vault to initialize.
1 2 3 4 5 6 7 8 9 10 11 12 13 14 15 16 17 18 19 |
> docker exec -it vaultserver vault operator init -address=http://127.0.0.1:8200 Unseal Key 1: mlgrUf7haKzHa4cXowW9xzpgNgdLTxQFyGcbkM5GHUXe Unseal Key 2: g36z3655F5nsgeA77BV/IR/0Wh3ILsnz5t95kdkZlHxr Unseal Key 3: TCqgtNLPTORMYf+/ws5AC2T87G8T0x7rSLbHr5zIWSHm Unseal Key 4: e45okHN/tiByFuMl+Z/GvRjU83b5cHJZF5lu9Bns3UOh Unseal Key 5: KKwrICvPLRnNgGr7fmQMZCII3XxXbNY7mfMZJjJILX82 Initial Root Token: 5mEKu64nAk1PA5luVQHRmGLM Vault initialized with 5 key shares and a key threshold of 3. Please securely distribute the key shares printed above. When the Vault is re-sealed, restarted, or stopped, you must supply at least 3 of these keys to unseal it before it can start servicing requests. Vault does not store the generated master key. Without at least 3 key to reconstruct the master key, Vault will remain permanently sealed! It is possible to generate new unseal keys, provided you have a quorum of existing unseal keys shares. See "vault operator rekey" for more information. |
As we can see it showed us some of the keys we need to use to unseal the Vault. So let unseal it so that we can use it. We will need to unseal the vault with the command 3 times using different keys each time for it, I have skipped the first one.
1 2 3 4 5 6 7 8 9 10 11 12 13 14 15 16 17 18 19 20 21 22 23 24 25 |
> docker exec -it vaultserver vault operator unseal -address=http://127.0.0.1:8200 e45okHN/tiByFuMl+Z/GvRjU83b5cHJZF5lu9Bns3UOh Key Value --- ----- Seal Type shamir Initialized true Sealed true Total Shares 5 Threshold 3 Unseal Progress 2/3 Unseal Nonce 9b51593c-3f01-76d6-216f-4cad41004898 Version 0.11.5 HA Enabled false > docker exec -it vaultserver vault operator unseal -address=http://127.0.0.1:8200 KKwrICvPLRnNgGr7fmQMZCII3XxXbNY7mfMZJjJILX82 Key Value --- ----- Seal Type shamir Initialized true Sealed false Total Shares 5 Threshold 3 Version 0.11.5 Cluster Name vault-cluster-664f96d2 Cluster ID 779cf699-e8c2-910a-0c91-f0a84ac93416 HA Enabled false |
Now we can use the Vault to write data to, first we need to auth with root token which was given to us when we started the Vault with the keys. My test envirnoment key was “5mEKu64nAk1PA5luVQHRmGLM”. Lets try to auth/login and also write and read something to Vault to store.
1 2 3 4 5 6 7 8 9 10 11 12 13 14 15 16 17 18 19 20 21 22 23 24 25 26 |
#Lets login to vault > docker exec -it vaultserver vault login -address=http://127.0.0.1:8200 5mEKu64nAk1PA5luVQHRmGLM Success! You are now authenticated. The token information displayed below is already stored in the token helper. You do NOT need to run "vault login" again. Future Vault requests will automatically use this token. Key Value --- ----- token 5mEKu64nAk1PA5luVQHRmGLM token_accessor 5jbd0wWj84cViLkKeoNrzsj4 token_duration ∞ token_renewable false token_policies ["root"] identity_policies [] policies ["root"] #Lets write to vault to store a secret > docker exec -it vaultserver vault write -address=http://127.0.0.1:8200 secret/hello value=world Success! Data written to: secret/hello #Lets read from vault our secret > docker exec -it vaultserver vault read -address=http://127.0.0.1:8200 secret/hello Key Value --- ----- refresh_interval 768h value world |
We can now also create a sample.json config file that a new Microservice can consume I have placed it in config folder since it was already mounted (note the file is in 1 line)
|
|
{ "domain": "www.example.com", "mongodb": { "host": "localhost", "port": 27017}, "mysql": "server=localhost;userid=myms_user;password=kjbgo4eFSzcHYyGf;persistsecurityinfo=True;port=32786;database=mymicroservicedb"} |
We can load the sample json data into Vault by using this command.
|
|
> docker exec -it vaultserver vault write -address=http://127.0.0.1:8200 secret/weatherapp/config "@/config/sample.json" Success! Data written to: secret/weatherapp/config |
I am using the weatherapp as a example above
We will most probably also create a policy file so that we can limit the access to this secret, this will be inside the policies directory
|
|
#policy.hcl path "secret/weatherapp/*" { policy = "read" } |
In order to load the policy into Vault we will use the command to load the policy in
|
|
> docker exec -it vaultserver vault policy write -address=http://127.0.0.1:8200 weatherapp policies/policy.hcl Success! Uploaded policy: weatherapp |
Now policy is in, lets test out Vault to read some of they values we just added.
|
|
> docker exec -it vaultserver vault read -address=http://127.0.0.1:8200 secret/weatherapp/config Key Value --- ----- refresh_interval 768h domain www.example.com mongodb map[host:localhost port:27017] mysql server=localhost;userid=myms_user;password=kjbgo4eFSzcHYyGf;persistsecurityinfo=True;port=32786;database=weatherappdb |
Above we have just used the root token to read but at least we know we can get the data
Wrap Token
Vault has a nice feature called wrap token, where you can give a limited amount of time to a token which one can use to access Vault. Lets try to create one for us.
|
|
> docker exec -it vaultserver vault read -wrap-ttl=60s -address=http://127.0.0.1:8200 secret/weatherapp/config Key Value --- ----- wrapping_token: lYO2AoJ95QEDnZgUbNxoWWsw wrapping_accessor: 5sRYcEaWMeWPWNXRCRcRLYg3 wrapping_token_ttl: 1m wrapping_token_creation_time: 2018-12-05 14:35:27.9383976 +0000 UTC wrapping_token_creation_path: secret/weatherapp/config |
We can use the wrap token above “lYO2AoJ95QEDnZgUbNxoWWsw ” to read the data now, and it is only valid for 60 seconds.
|
|
> docker exec -it vaultserver vault unwrap -address=http://127.0.0.1:8200 lYO2AoJ95QEDnZgUbNxoWWsw Key Value --- ----- refresh_interval 768h domain www.example.com mongodb map[host:localhost port:27017] mysql server=localhost;userid=myms_user;password=kjbgo4eFSzcHYyGf;persistsecurityinfo=True;port=32786;database=weatherappdb |
If we try to use another token of if the token is already used we will get an error like below.
|
|
> docker exec -it vaultserver vault unwrap -address=http://127.0.0.1:8200 8rVXefosA13JfYsPyzkbkEXY Error unwrapping: Error making API request. URL: PUT http://127.0.0.1:8200/v1/sys/wrapping/unwrap Code: 400. Errors: * wrapping token is not valid or does not exist |
App Roles and Secrets
Now that we have learned something about Wrap tokens of how to create and use them, I wanted to switch gear and talk about App Roles and Secrets. Vault provides app roles for you application to login to the system. This is definitely not the best security option out there since its just a like a basic authentication with username and password, but when we use wrap token with it we can mitigate some of the security concerns.
There are better options out there using kubernetes to authenticate for you app etc I will try to cover those later in another blog post
Lets create us an approle for our weather app, and get the roleid that we can use for our application.
|
|
> docker exec -it vaultserver vault auth enable -address=http://127.0.0.1:8200 approle Success! Enabled approle auth method at: approle/ #create the user weatherrole > docker exec -it vaultserver vault write -address=http://127.0.0.1:8200 auth/approle/role/weatherrole secret_id_ttl=10m token_num_uses=10 token_ttl=20m token_max_ttl=30m secret_id_num_uses=40 policies=weatherapp Success! Data written to: auth/approle/role/weatherrole #Get the roleid > docker exec -it vaultserver vault read -address=http://127.0.0.1:8200 auth/approle/role/weatherrole/role-id Key Value --- ----- role_id 27f8905d-ec50-26ec-b2da-69dacf44b5b8 |
Sample Application
Now that we have the roleid we now need a secret in order for our application to login to Vault and get its secrets. Rather than just giving the secret to our application we will give it a wrap token to get the secret since we can time limit the amount of time the token is allowed to live, thus mitigating the risk of exposing the secret. The sample code below is using the env variable and the wrap token to get its secret.
1 2 3 4 5 6 7 8 9 10 11 12 13 14 15 16 17 18 19 20 21 22 23 24 25 26 27 28 29 30 31 32 33 34 35 36 37 38 39 40 41 42 43 44 45 |
//get the wrap token from passed in parameter var wrap_token = process.argv[2]; if(!wrap_token){ console.error("No wrap token, enter token as argument"); process.exit(); } var options = { apiVersion: 'v1', // default endpoint: 'http://127.0.0.1:8200', token: wrap_token //wrap token }; console.log("Token being used " + process.argv[2]); // get new instance of the client var vault = require("node-vault")(options); //role that you are using const roleId = '27f8905d-ec50-26ec-b2da-69dacf44b5b8'; //using the wrap token to unwrap and get the secret vault.unwrap().then((result) => { var secretId = result.data.secret_id; console.log("Your secret id is " + result.data.secret_id); //login with approleLogin vault.approleLogin({ role_id: roleId, secret_id: secretId }).then((login_result) => { var client_token = login_result.auth.client_token; console.log("Using client token to login " + client_token); var client_options = { apiVersion: 'v1', // default endpoint: 'http://127.0.0.1:8200', token: client_token //client token }; var client_vault = require("node-vault")(client_options); client_vault.read('secret/weatherapp/config').then((read_result) => { console.log(read_result); }); }); }).catch(console.error); |
I am using node-vault, you can install node-vault by > npm install node-vault
In the above code we can see that we have hard coded the roleid into our code, but we mitigated the risk of someone stealing our docker env variable by having a limited time to live for the wrap token to authenticate and get our secrets from Vault. The command to generate the wrap token is below.
|
|
> docker exec -it vaultserver vault write -wrap-ttl=2m -address=http://127.0.0.1:8200 -f auth/approle/role/weatherrole/secret-id Key Value --- ----- wrapping_token: 8LEZFOxTBNKpjoYaAtcBwS7v wrapping_accessor: 3cE1v6pDt9b5BVPfVbv5Ql8e wrapping_token_ttl: 2m wrapping_token_creation_time: 2018-12-07 15:41:42.6447706 +0000 UTC wrapping_token_creation_path: auth/approle/role/weatherrole/secret-id |
When we run the code we would do something like, with the third parameter being the wrap token.
|
|
> nodejs app.js 8LEZFOxTBNKpjoYaAtcBwS7v Token being used 8LEZFOxTBNKpjoYaAtcBwS7v Your secret id is c8894b1e-2d4f-9249-426d-caeef465a812 Using client token to login 1YQ4fQR2XtjivdQE1rjIqRNj { request_id: '630114b4-8c98-0a2c-8313-bf4dd1a68b34', lease_id: '', renewable: false, lease_duration: 2764800, data: { domain: 'www.example.com', mongodb: { host: 'localhost', port: 27017 }, mysql: 'server=localhost;userid=myms_user;password=kjbgo4eFSzcHYyGf;persistsecurityinfo=True;port=32786;database=weatherappdb' }, wrap_info: null, warnings: null, auth: null } |
If we try to reuse the wrap token we will get an error.
|
|
Token being used g5J0e9zOFmThqKDgBiHofbh4 { Error: wrapping token is not valid or does not exist................ |
Summary
We have covered using roleid and secret using Vault to authenticate and get our application secrets. There is definitely a down side to this, but we mitigated the risk by having a short time for the wrap token to live. There is also the option of having the wrap token mounted as a volume for your application and pick it up from the volume that was mounted. I will cover those topics in a later blog post.
Advantages
- Even with docker inspect we are only are able to see the token which is last with a TTL and is a guid token the attack surface would be lower.
- A very simple pattern to follow, all config are stored with application Name (e.g secret/appName/config, etc)
Disadvantages
- The microservice would require some Restful call to Vault to consume data, may have dependency on vault library to consume it
- DevOps or some scripts would still be required to put secrets in the correct place
- Failure of Vault what happens? Service does not start
Source code at
https://github.com/taswar/weatherappwithvault



 Azure Timer Schedule